 |
Left: HMAT A1 Hymettus from Melbourne to Suez |
1821 Info 11f2-1 for Walter John Thomas Blackman
(Tom) |
To Flanders and France
|
Left: HMAT A1 Hymettus from Melbourne to Suez |
| Right: HMT Arcadian from Alexandria to UK |  |
Tom eventually rejoined 2/AFA on 12 September 1917. At this time 2/AFA were scattered over the Ypres area of Belgium with their Headquarters at Renninghelst, the modern Reningelst, near Poperinghe (possibly Lanbouver Farm G21.b.1.1) As it is not know which section Tom served with, it is difficult to give more than a general overview of his time in Flanders and France.
The disposition of 2/AFA around Ypres, shown on the table and map below, was
| Ambulances | |||||||
| Location | Map 28NW4 | Officers | OR | Wheeled litters |
Horse | Car | Motor |
| Krusatraat Collecting Post | H24.a.6.8 | 5 | 1 | 2 | |||
| Lillegate Collecting Post | I14.a.9.4 | 13 | 2 | 2 | |||
| Railway Dugout ADS | I21.d.6.7 | 2 | 20 | 2 | |||
| Railway Cutting RAP | I29.c.3.4 | 4 | 1 | ||||
| Sunken Road RAP | I28.d.4.4 | 4 | 1 | ||||
| Bedford House ADS | I26.a.8.2 | 2 | 28 | 2 | 1 | ||
| Bluff RAP | I33.a.9.5.0.5 | 8 | |||||
| Branhoek Main Dressing St - | G12.b.8.5 | C Section | 5 | ||||
 |
| Above: Distribution of 2/AFA October 1916 Source: 2/AFA War Diary October 1916 - with addition Click on the map to open a scalable A4 pdf file in a new window |
Casualties from:
Hoverbox Photo Gallery - Ambulances
This feature does not function correctly on phones and tablets
| 1 - Horse drawn ambulance. AWM E20103 | 2 - 3/AFA with a Sunbeam motor ambulance 1916. State Library of South Australia |
| 1 | 2 |
|---|

|

|
Hoverbox Photo Gallery - 2/AFA locations
This feature does not function correctly on phones and tablets
| 1 - Lille Gate, Ypres, 1917 2 - Lille Gate, Ypres, 2017 |
3 - Bedford House Chateau before the war 4 - Bedford House Cemetery 2017 |
| 1 | 2 | 3 | 4 |
|---|

|

|

|

|
During the month of September the following numbers of casualties were evacuated to:
With the HQ still based at Reninghelst [modern Reningelst], 22 reinforcements arrived on 3 October 1916, making a compliment of 246. Although Tom arrived in September, no reinforcements were recorded in that month. The process of 2/AFA leaving the Ypres area and handing over establishments, began on 12 September: on the 12th Bedford House to 4/AFA; on the 13th Lillegate to 5/AFA and on the 14th Brandhoek to the 5/AFA. On the 15 September HQ marched out of Reninghelst.
 |
| Above: Map of Belgium and northern France showing 2/AFA movement in October 1916 |
A minor operation at Flers–Courcelette
The Battle of Flers-Courcelette was fought between 15-22 September 1916 as part of the Battle of the Somme. The 2/AFA arrived in the area on 30 October 1916, taking over from 87th Imperial Field Ambulance, and stayed until 14 November 1916. They took over three Sunbeam ambulance cars from 3/AFA and one Ford motor ambulance from 1/AFA. At 12.30am on 05 November 1916, with their HQ at Bernafay, the unit was involved in 1/Australian Brigade's minor operation: a night attack against Bayonet Trench some 500 yards north of Guedudecourt. At about 0130, 50 men of 2/Bn AIF reported as extra stretcher bearers and by 0400 the remaining Bearers were called out increasing the number to 271. With one Bearer killed and another wounded whilst trying to evacuated six cases from 'No Man's Land' RAP, the post was cleared after dark. The remaining RAPs were cleared on the evening of the 5th. Again there is no indication of Tom's part in the action.
 |
Left: An outline map locating the Flers evacuation route Source:
2/AFA War Diary November 1916 page 7 Click on the map to open a scalable A4 pdf file of the original in a new window The map shows the location of various 2/AFA posts, the route between them and the distances carried. This includes a length of tramway. It has not been possible to accurately transfer these details to the Longueval 57cSW3 and Gueudecourt 57cSW1 trench maps. The War Diary details the number of officers and OR at each location. In the month of November winter arrived early increasing the number of casualties taken to the Corps Rest Station to: OR sick 2102, OR wounded 786, Officers sick 38, Officers wounded 24. |
Stretcher Bearers carried the injured from the RAPs to the Bull Trench and North Flers Collecting Posts and on to East Flers and the tram line. From the Wagon Rendezvous horse drawn ambulances, on an hourly service, took the casualties to the Advanced Dressing Station. Here the casualties were assessed and sent to Bécordel-Becourt: the slight cases went to the Corps Collecting Station and the sever cases to the Corps Main Dressing Station. The ambulance frequency changed according to the state of the road, often taking six hours for seven miles, and the carriers were changed every four days as mud in the forward areas was often knee deep.
Hot drinks were served at the Collecting and Relay Posts and dressings were changed. At the Advanced Dressing Station the main dressing of wounds took place, anti-tetanus serum was given and the general comfort of the casualties address: hot coffee, tea, cocoa and milk were served, together with a full supply [of food].
Stocks of surgical, shell dressings, gauze and wool were kept at all posts, with a stock of not less than 24 blankets. One hundred stretchers were shared between the three relay posts. At the Advanced Dressing Station there were 700 blankets, 200 stretchers, 1000 emergency rations, 3000 anti-tetanus and a full stock of medical comforts.
2/AFA remained in the Somme area. On 14 November 1916, they marched out of their Bernafay HQ arriving at Buire[-sur-Ancre] the following day. On 18 November, 2/AFA established a hospital in Grand Maison, rue de Vignacourt, La Chaussee[-Tirancourt. On the last day of the month they entrained at Vignacourt for Edgehill (Dernancourt, map reference: 62d NE1 E.20.b), before marching through Buire to Ribemont[-sur-Ancre]. From here their hospital sent casualties to CCS at Heilly or the Corps Rest Station at Buire. On 05 December 1916, 100 men were bussed to Frécourt, before marching to Buire the next day to assist in running the Corps Rest Station. From 21 December until 26 January, 1917 through one of the coldest winters on record, 2/AFA operated from 1 ANZAC Corps Rest Station at Belle View (Albert (Map reference 57d SE4 5.c.5.5)). After the snow had melted on 13 January 1917, the HQ relocated, on 26 January, to the Bottom Wood railway junction to take over the 150 bed dressing station east of Albert (Map reference Ovillers 57d SE4 X28.b and 29.a). On 9 February 1917, two days after Tom was detached, the unit HQ moved 2,200 yards due west to Bécourt Chateau (Map reference Ovillers 57d SE4 X25.d.6.6).
 |
| Above: Trench map locating Bottom Wood showing the railway sidings used by the CCS and Beucourt Chateau. It is interesting to note that on 02 April 1917, Tom's brother-in-law Nelson Wellington was Brigade Major to the 7th Brigade at Shelter Wood. Click on the map to open a scalable A4 pdf file in a new window |
Visiting his brother's grave
The date of Tom's visit to Leslie Crompton BLACKMAN's grave at Berks Extension Cemetery, Ploegsteert Wood, is unknown. The photograph shows winter snow and from his calendar it must have been the winter of 1916-1917. The War Diary of 2/AFA describes it as one of the coldest and harshest in France and Flanders' history. An agonising cold that bit early. There is no obvious date when Tom was near Ploegsteert. The table below locates Tom's units and their distance from Ploegsteert, but remains inconclusive.
| Date | Unit | Location | Distance from Ploegsteert in km |
Weather |
| 01/11/16 | 2/AFA | Flers | 110 | |
| 01/11/16 | 2/AFA | Buire-sur-le-Ancre | 133 | |
| 01/12/16 | 2/AFA | Belle View, Albert | 114 | |
| 01/11/17 | 2/AFA | Belle View, Albert | 114 | Snow |
| 01/02/17 | 2/AFA | Bottom Wood, Albert | 114 | |
| 01/02/17 | 5/Div | Bernafay Wood, Longueval | 104 | |
| 01/03/17 | 5/Div | Bernafay Wood, Longueval | 104 | |
| 28/03/17 | 5/Div | Beaulen Court, south of Bapaume | 95 | |
| 01/04/17 | 5/Div | Beaulen Court, south of Bapaume | 95 | |
| 22/04/17 | 55/Bn | The Dingle, north of Fricourt | 128 | Cold and sunny |
| 01/05/17 | 55/Bn |
Bécourt |
114 |
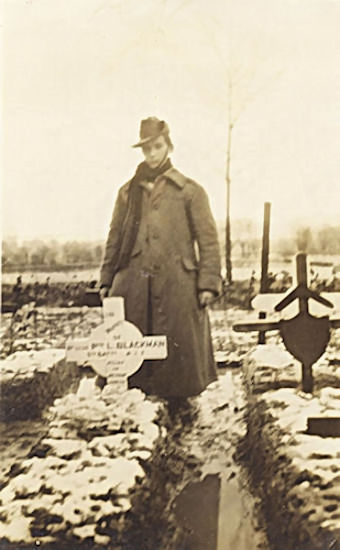 |
In modern times the author has stood on the same spot on five occasions. Until
2015 he thought he was the first family member to pay their respects.
Left: Tom Blackman at his brother's grave in Berks Cemetery Extension circa February 1917 Source: Heather Schoffelen |
A transfer to 55th Battalion
| At this moment there is no knowledge as to why Tom transferred to an infantry battalion.
The units War Diary for February 1917 shows them to be based at Trones Wood camp with a
strength of 26 Officers and 872 OR. On 05 February 1917, the OR strength increases by one
and on the 7th by two. However, Tom was immediately transferred to 5th Division Headquarters,
who were based at Bernafay Wood south of Longueval, as a clerk and where 2/AFA had it's
headquarters on 05 November 1916.
Right: Men of 2/Officer Training Battalion (OTB), cadets of Pembroke College, parade in Cambridge circa 1917 |
 |
On 01 May 1917, in fine and warm weather, Tom returned to 55/Bn as one of 40 reinforcements, whilst the battalion was training at Bécourt before moving to Faurevil on 07 May 1917, when they went into the line. They returned to Faurevil camp on 26 May 1917. There is no obvious record of Tom being sent to 2/OTB based at Pembroke College, Cambridge, 1 not Pemberton College as listed in Tom's record.
 |
| A very proud William Blackman announces to Ballarat that his son Tom had been
commissioned. Two weeks later Tom was buried alive at Polygon Wood. I wonder how long it
took Tom's letter to reach William. His OTC course began in May 1917 and he arrived with
the 55/Bn on 20 September. I wonder how long it took the AIF to inform William that Tom
was in hospital? Right: Ballarat Evening Echo of 12 September 1917 - Source: Trove |
 |
The Battle of Polygon Wood - 26 September 1917
| Right: Cross channel ferry Invicta in Boulogne |  |
| Starting with the Battle of Messines, the Battle of Polygon Wood, from 26
September 1917 to 30 September 1917, was the fourth in a series of 'bite and
hold' battles in the Third Battle of Ypres series, later known a Passchendaele:
Haig's planned advance to break the deadlock on the Ypres Salient and to advance
to the Belgium coast depriving the German U-boat of pens at Zeebrugge, from where they
attacked merchant shipping. A series of well-planned, limited advances, supported by
large volumes of artillery, were masterminded by General Herbert Plumer, ending with
Broodseinde Ridge on 04 October 1917, where John Henry Crompton was Killed in Action.
Right: 55/Battalion colour patch - 14/Brigade, 5/Division |
 |
 |
| Above: A map showing the battles of 1917, of which Polygon Wood was one |
Neither the August nor September 1917 War Diary recorded Tom Blackman’s arrival to the Battalion. His service record shows that he joined on 20 September 1917, six days before the battle. However the War Diary for September 1917 shows no officer joining the Battalion as reinforcements. 1 Nor is it known which company Tom was attached to but it is assumed to be either ‘A’ Coy. or ‘C’ Coy. who were involved in the battle. This narrative outlines the part he and his platoon would have taken and their experiences in the Battle of Polygon Wood on 26 September 1917. Tom’s service record suggests he could have been in the field until 03 October 1917.
Polygon Wood
Today Polygon Wood is a large, roughly five sided, state owned wood 1.6km south of Zonnebeke, containing two Commonwealth War Grave Cemeteries: Buttes New British Cemetery and Polygon Wood Cemetery. The wood changed hands five time during the war in which time much of the original wood was destroyed. Polygon Wood is dominated by a mound called the ‘Butte’. Built by the Belgian military as a firing range before the war, it had been fortified by the Germans and was used as an observation post. At the centre of the wood, that is crossed by intersecting rides, was the oval ‘Racecourse’ used by the pre-war Belgium cavalry and gunners working their limbers. Lyn MacDonald’s 1914 says that the Belgium Olympic equestrian team trained there.
Today the wood has returned to thick undergrowth with the rides making wonderful walks. At the north-east corner and surrounded by a low wall is the green mowed grass of the cemetery dominated by the Butte and 5th Division monument.
The approach march
On 21 September 55/Battalion moved to Chateau Segard in full marching order. On the night of 22/23 September, the Battalion began their move to the left of the attack line to relieve 2/Battalion of 1/Australian Division. The route was Chateau Segard, to map reference H.24 central, to Shrapnel Corner [Howitzer Spur], to the north of Zillebeke Lake, Tottenham Corner, Oxford Circus, Birr Track to Leinster Farm and Zouave Wood, the planked road to the south of Hooge before crossing the Menin Road and to map reference I.18.b.1.6. 2 In part, this roughly a nine hour cross country route, missed the constantly shell targeted areas such as Hellfire Corner.
[The] battalion moved through the remains of Ypres, out through the Menin Gate and up the Menin Road towards the sound of the guns. Platoons gathered in groups and passed Hellfire Corner in short rushes to avoid the relentless German shelling. The country forward of Ypres was 'a scene of desolation and destruction', contested by the wartime protagonists for years. The Menin Road was lined with dead horses and mules, destroyed wagons and guns. In the distance the remnants of woods could be seen while the British guns, in some places almost wheel to wheel, fired on distant targets, their flashes lighting both the sky and the terrain. The road forward was crammed with men and vehicles, all making their way to the front. At Birr Crossroads near Hooge, the battalions met the guides who would lead them forward to the front. At dusk the troops arrived at the plank road and then continued to march westward towards Westhoek Ridge where they halted close to the 50th Battalion and sought shelter in shell holes. From here the men would make their final approach to the jumping-off tapes which had been laid by the battalion intelligence officer and the battalion scouts. 3
By 8am on 24 September, 14/Brigade had relieved two battalions in Glencorse Wood, 4 with units holding the front line. That night 55/Battalion was relieved by the 54th and they moved to Halfway House 5 where it was reported ‘all men are in high spirits and eagerly awaiting a chance to get to close quarters with [the enemy]’.6 The Battalion moved from Halfway House at 12.15am proceeding to the assembly area reaching the jump off tape at 2.30am. Excellent discipline was maintained and the Battalion moved into position without casualties. 7
 |
| Above: Trench maps showing the approach march to Polygon
Wood. The precise route is unknown. Some roads may be used but also farm tracks and
duck boarded army routes. Three locations cannot be traced in gazetteers. Click on the map to open a scalable A4 pdf file in a new window |


The Battalion held the line for 48 hours before the attack and during that period the officers became thoroughly acquainted with the ground in front of them. Aerial reconnaissance and photographs showed the enemy had built their very well camouflaged east facing dugouts behind and in front of the Blue Line. A great number were incomplete or destroyed dug-outs and some little distance behind the trench in an incomplete line.
The day before the attack 53/Battalion assembled in Nonne Bosschen Wood, the frequent target of German guns. The 55th and 56th Battalion assembled five yards to the rear of the 53rd who were tasked with capturing the Red Line first objective, a distance of 750m. Once taken the 55th and 56th were to leap frog through and capture a further 350m and consolidate the Blue Line between J.4.d.30 and J.4.d.36. On the night of 25 September the Battalion followed the white tapes, in artillery formation of small single file groups at 50 yard intervals, to the taped assembly area. 8 The Battalion was in position by 3am with no casualties.
Each man carried their uneaten day’s rations, iron rations, socks and their canteen of water for at least 48 hours. Anti-gas goggles and their box respirator were kept handy, with their waterproof sheet in their pack. In addition they carried 120 rounds small arms ammunition (SAA), two bombs, two sandbags, field dressing, entrenching tools and a breech cover to prevent mud getting into the rifles mechanism.
 |
| Above: A full trench map of Polygon Wood showing the
units involved and the objective lines and features that appear in the slide show Click on the map to open a scalable A4 pdf file in a new window |
At precisely 5.50am on the morning of 26 September, Zero hour was announced by a perfect but noisy artillery barrage of smoke put down 150 yards in front of the forming up line. After resting there for three minutes, high explosive and shrapnel crept forward, to timetable, with the three attacking close formation battalions following very closely behind. Section Commanders everywhere led their sections forward in good order in worm fashion as recently trained and followed the barrage closely. All went smoothly. In moving to the first objective it was difficult to hold the men in check. Captain Cotterell of the 55th, led the advance at stroll, cigarette in mouth and map in hand. After four minutes the Battalion had ‘walked’ through the feeble enemy barrage and their shells fell behind them. An effective Australian counter barrage resulted in few casualties from incoming shells. However, immediately before the advance one or two enemy shells burst close to ‘C’ Coy. inflicting three or four casualties.
Meeting very little resistance, 53/Battalion reached the Red Line on time. In the mist and smoke, restricting visibility to 15 yards, those following lost direction, drifting slightly left. Units intermingled with one another though map and compass set the right direction. The area was thoroughly mopped up and the very few machine gun nests that remained in the first 500 yards were smothered by leading sections before they could offer resistance.
The barrage halted on the Red Line enabling 55/Battalion’s officers to re-organise for the second advance. At zero plus 100 minutes the barrage increased in intensity and crept forward at the slower rate of 100 yards in eight minutes. 55/Battalion moved forward simultaneously with 56/Battalion on its right. In the advance to the Blue Line, the manned shell holes, pill boxes and strong posts were more numerous. The men broke into eights or nines to mop up as frightened enemy were eagerly surrendered. No serious check was given until the barrage halted.
 |
| Above: Polygon Wood attack in detail showing 55/Battalion's attacking company and the German and 55/Battalion defences |
The Blue Line, clearly marked by 18 pounders smoke shells, was reached at 8.30am when the troops immediately began to dig in, reorganise and consolidate. Battalion HQ was built into the Butte using an enemy dugout at I.10.a.6.9. At 8.50am fighting patrols made contact with the flanking units dealing with enemy strong holds: on the left 20 prisoner with two machine guns surrendered immediately. One officer, one sergeant and two others attacked the strong point on the right, which resisted until, when bombed, the crew of the machine gun was put out of action and over 30 prisoners taken with their machine gun.
At some point in the battle, Tom and four of his platoon were buried by a British fall-short. The time and location are not known. By the time the objective was reached the Battalion had only suffered about 7% casualties and the majority of wounds were slight. However, the War Diary records what may have been Tom’s burial by friendly fire with the sentence There were only three or four casualties from our own barrage. ie Tom and some of his platoon, as recorded by his Repatriation Record.
 |
| Above: An extract from 55/Battalion's War Diary for September 1917 page 12 |
A collection of contemporary photos


When dug out, Tom continued to fight with his unit until the battle was over, then he collapsed. He may have been involved in the consolidation under the protection of the Australian barrage, which died down at 11.17am. The Battalion constructed a fairly formidable system of strong points and trenches, which were eventually deepened and connected by saps, 9 in preparation for any counter attacks. At 3.20am on the 27th, the 55th reported all quiet and satisfactory. If a counter attack was planned for dawn on the 27th the attempt was frustrated by a barrage which went down at 5am. The first counter attack followed at 4pm, when a mass of enemy was seen moving from pill box to pill box. At about 7pm however, hundreds of the enemy came across the sky-line in small groups and concentrated at several points. At 7.15pm the enemy advanced in three waves but were cut up by the Australian barrage, which came down on the advancing enemy. Those that were not cut up by shells were mowed down by Lewis Gun and rifle fire. Enemy stretcher bearers were later seen carrying a great number of dead and wounded to the rear.
 |
| Above: An extract from 55/Battalion's War Diary for September 1917 page 10 |
The ‘Bosche’ did not reach the 55/Battalion lines at any point and no further attempts were made. Though bothered by snipers, the Battalion continued to hold the line until the night of the 30 September/1 October when they were relieved by 20/Manchester’s of 22/Brigade. It was felt safer to be at the front than being shelled when in support at the rear. The relief was completed at 9.30pm without any casualties and proceeded to the rest camp 10 where hot food awaited all ranks.
The enemies Order of Battle (OB) was the 34th Fusiliers, the II Reserve Infantry Regiment (RIR) the 49th RIR. The 229th RIR, the 230th RIR and the 457 Infantry Regiment. Nothing is known of their status or fighting strength.
The total casualties numbered Officers wounded 7, shell shock 1; Other ranks killed 40, wounded 137 largely caused by machine-guns in the strong points, which were very active. Does this record Tom’s injury? If so it recognises the immediate severity of the situation whilst Tom was still with the Battalion?
 |
| Above: An extract from 55/Battalion's War Diary for September 1917 page 12 |
 |
| Above: A composite map showing 55/Battalion's supporting barrage |
Artillery
Who was responsible for the fall-short?
Perhaps half of the 64 guns of the 3/Australian Divisional Artillery, part of 5/Division Artillery Group, were responsible for supporting 14/Brigade, who also had eight mobile guns to aid consolidation of land won. Sixteen guns were in reserve. On the left were 7/Australian Field Artillery (Aus FA) and on the right 8/Aus FA some 400m behind the Assembly Line. They were responsible for the 18-pounder (range 6,500 yards) artillery barrage to be put down 150 yards in front of the infantry line at Zero. This moved forward at Zero plus 3, with subsequent timed lifts.
In the post battle analysis, the artillery shoot was described as very successful and accurate all day, especially in breaking up the counter attacks. It was reported that the majority of the woods west of the Broodseinde-Becelaere Ridge had been recently destroyed or very much thinned out by artillery fire. However, on 24 September and before the attack, two shells were reported as fall shorts.11 Therefore fall shorts, usually caused by worn barrels and atmospherics, did occur and as such were responsible for Tom being buried alive as shown in his Repatriation report.
Medical matters
By 10am, on 26 September, the Regimental Aid Post (RAP) moved forward from Nonne Bosschen Wood, to the Butte, 400 yards behind the front line. An advanced post was made 200 yards in front in a pill box to which the stretcher bearers carried the wounded and gave first aid, preventing congestion in the RAP. The RAP is believed to have utilized one of the German dugouts on the north-east side of the Butte facing the German rear. The photograph shows newly dug Australian dug outs on the Australia side of the Butte, which may have been a safer RDA. The wounded were cleared by 10am on 27 September. Since no Field Ambulances were to go beyond the RAP, the Battalion had to augment their own stretcher-bearers with about 30 enemy medical corps prisoners taken at the Butte who were used to carry the few wounded.
In the 5/Division War Dairy, 14/Brigade’s RAPs were planned at map references J.10.a.6.8 and J.10.a.5.8 with relay posts, manned by Field Ambulance bearers, at J.9.a.4.6 and J.14.b.9.7. The walking wounded were taken by first by wagon, from the Advanced Waggon (sic) Loading Post at I.18.b.2.7 (Hooge Crater) and I.17.b.3.8 (Birr Cross Road) and by lorry or Sunbeam ambulance cars to the Advanced Dressing Station at H.27.c.2.8 in a school across the eastern moat on the Menin Road at Ypres, a distance of approximately 5500 yards. 12 The 14/AFA recorded casualties as Officers 4 O. Ranks 106 and no delays.
Eight unnamed officers were wounded during the battle but none were sent to hospital or Casualty Clearing Station (CCS) at Remy Sidings, though one unnamed officer went to hospital or CCS on 04 October 1917 13 when II ANZAC were involved in the Battle of Broodseinde.
If Tom was the recognised ‘shell shock’ case then this may plot his journey to the rear and to safety in Le Harve on 03 October and to hospital two weeks later.
A slide show of Polygon Wood 04 October 2017 - photos by author


Conclusion
Judging by how few casualties 55/Battalion sustained, with only seven officers wounded and none seriously, the chances of Tom surviving the attack were very high. He could have lived to have fought on in the war: to holding Villers Bretonneux until the Battalion was driven out, to fight at Mont Saint Quentin and the crossing of the St. Quinten Canal, their last action of the war. His future chances of survival and possible promotion cannot be calculated.
Without those recorded fall-shorts Tom would not have spent the next 50 years in and out of mental institutions. Like many in the Great War, the productive life of a gentleman was lost.
| Right: Tom Blackman's memorial New Buttes 04 October 2017, with the
author's flowers in front the wreath laid by Princess Astrid of Belgium at the
Dawn Service 26 September 2017. At the ceremony she spoke of:
'young men, aspiring for a long and happy life with talents and skills, with dreams and plans, with intelligence and emotions, brave young men comrades in war, very far from home. ... My country is grateful, extremely grateful for the freedom we enjoy today. ... Even after a century their memory is alive. ... Thank you. We will remember you always.' |
 |
Notes
1 The August return records five 2nd Lieutenants joining the Battalion from the
Cadet Battalion, similar to the one Tom attended at Cambridge. Tom is not on the August list.
2 See map numbers 1, 2, 3,6, 7 and 9. The other names can’t be traced
3 Passlow p.100
4 Map reference J.14.a&d – see map 10
5 Map reference I.16.d – see map 11
6 This text refers to hand written information, usually in the first few pages of the
War Diary.
7 Text in Courier New are extracted from the War Diary typed orders and reports.
8Though the War Diary refers to the assembly area being in Appendix A there is no
indication as to where this was. It is assumed to be at the green start line, behind the
53/Battalion.
9 See map above
10 Situated at H.22.c.9.1 - see map id 13 on the second map
11 See map Advanced Dressing Station
12 55th Battalion War Diary, October 1917
13 Map reference J.9.b.6.3 - see map with explosion
Sources
| More information 1 |
 |
No.2 Office Training Battalion
The Army Council created Officer Training Battalions (OTB) in December 1916. They were organised like an army battalion: four companies of four platoons commanded by an instructor. Originally, cadets were in training for four months, but this was latter extended to six months. They were formed as a mini-Sandhurst with training being in military skills and behaviour: a pre-commission course. In 1915 and 1916, especially after Loos, the pool of school OTC temporary gentlemen and those recommended for a commission by the Head or the Commanding Officer had dried up due to the high casualty rate and the expanding army. There was concern about the efficiency of those remaining. Some were asked to resign, others were shunted into safe jobs and one was sacked. Twenty-four infantry OTBs were created with numbers 1 to 11 being established by March 1916 in country houses or Oxbridge Colleges: 2/OTB and 5/OTB were in Cambridge Colleges. The Inns of Court 14/OTB was established in September/October 1916 from those not passing through their particular system. Brigadier James calculated there were 73,000 commissioned from OTB with a probable total of 145,621 from the total of 54 all-services OTBs. Potential officers underwent 540 hours of training, which comprised of:
The instructor were largely officers on light duties and recovering from wounds. Some were highly decorated. One third of the instructors at 2/OTB Pembroke College were Cambridge OTC instructors commanded by CO of the Cambridge OTC. The impact of the scheme was to create a more effective junior officer. There were few inefficient officers and only one in ten failed the system. The majority had been through the trenches and through battle. Cadets may have been pushed through the system in a production line, but in 1917 and 1918, the BEF needed its replacement junior officers. Source: Officer Cadet Battalions, Charles Fair, Western Front Association podcast (Accessed: 29 April 2021) |
| More information 2: |
|
The Battle of Polygon Wood
Polygon Wood was a battle that merited the 5 Division’s memorial. It was however a battle in two parts. The right wing, bordering the British battalions, was hard fought against German counter attacks that drove back the British and necessitated the Australians building defensive flanks. The lost ground was recovered only with hard fighting. On the left flank, the battle was straight forward and relatively ‘easy’ against Germans defensive tactics that could not blunt the growing material superiority of the BEF. p.ix German defensive tactics Inside the wooded area, aerial photographs showed few signs of organised defence, with just a single line of holes and a lone trench visible. Along the southern edge of the wood was a well-constructed trench running east-west, while a strongpoint was visible in the south-west corner of the woods. Several concrete structures were also identified in the 'racecourse' — the objectives of 14 Brigade. p.33 To conserve manpower, the German’s adopted the tactic of thinly held front-line. Whenever the British bombard German front-line positions the bulk of the defending infantry were to be withdrawn to safer positions in the main line of resistance. German artillery was registered on these advanced posts so when a British attack commenced, the German guns were fired a barrage to immediately disperse any British assault. The front-line defenders were scattered in shell-hole positions rather than continuous lines of trenches connected, where practical, by 'crawl trenches' or tunnels. Close behind these forward shell-hole positions were strongpoints to hold machine-guns, assault troops and support troops. In many instances these strongpoints were concrete structures, constructed using pre-cast concrete blocks or built on site, and scattered throughout the German defensive zone. p.33 The Australian Artillery plan for the Battle of Polygon Wood In all, I Anzac Corps employed 216 field guns to support and protect the infantry. In addition, each of the attacking divisions could also utilise I Anzac Corps’ heavy and medium batteries. The heavy artillery consisted 208 guns […] including the 9.2-inch guns of the 54th Australian Siege Battery. p.63 Daily fire tasks included wire-cutting, destruction of strongpoints, harassing fire on communications and counter battery shoots to isolate guns and prevent the movement of ammunition and supplies. […] The creeping barrage began 150 yards ahead of the infantry, advanced at a rate of 100 yards every three minutes and comprised four lines of artillery fire. Closest to the advancing troops, the fire was provided by 18-pounders firing a mix of shrapnel and explosive shells. Some 200 yards further ahead was another barrage line comprising a mix of 18-pounder and 4.5-inch howitzers. A further barrage line was fired another 200 yards ahead, this time consisting of 6-inch howitzers. Finally, a further 200 yards ahead again, was a barrage line fired by 8-inch howitzers, 9.2-inch howitzers and 60-pounder guns. […] To signal the infantry that the advance was about to restart and move forward from the first objective to the second objective, the barrage would quicken from one round per minute to four rounds per minute for four minutes to allow the troops time to close up on the barrage before it began to advance again. p.63 The Australian Battle Plan By 23 September 1917 the 4th and 5th Australian divisions had relieved the 1st and 2nd Australian divisions and preparations were under way for the next attack. Each of the divisions would attack with two brigades, with each brigade attacking its first objective (Red Line) with one battalion and the second objective (Blue Line) with two. The more difficult task was the attack on the main ridge line and this was given to the 5th Australian Division which was fresh after four month’s rest. […] Major General Hobbs, commanding the 5th Australian Division, opted to attack with the 14th and 15th brigades, leaving the 8th Brigade in reserve. p.86 […] In the 14th Australian Brigade, the 53rd Battalion would seize the Red Line while the 55th and 56th battalions assaulted towards the second objective. Finally, in the 15th Brigade, the 60th Battalion would take the Red Line and the 57th and 59th battalions would capture the Blue Line. Each attacking battalion was allocated two Stokes mortars from the brigade light trench mortar battery to support the attack, in addition to the battalion's own weapons. p.87 Brigadier General Hobkirk, commander of the 14th Brigade, decided that his attacking battalions would each spend time in the front line to familiarise themselves with the ground, while the 15th Brigade opted to hold the front line with their reserve battalions and send forward officers and NCOs from their attacking battalions to reconnoitre the ground over which they would advance. p.87 |
| More information 2: continued |
|
The Fifth Division
The 5th Australian Division moved up from behind the lines to assemble for the attack, although the fighting on 25 September 1917 had complicated the 15th Brigade's task. The 14th Brigade had moved into the front line on the night of 22/23 September, initially occupying the entire 5th Division frontage until the 15th Brigade moved forward the following night to take over its sector of the front. Private Allen Clements of the 54th Battalion (14 Brigade, 5 Division) wrote: ... Came along the road today. Dead horses, mules and men lying everywhere, burning motor lorries all over the place. Tanks coming up the road in dozens for the hop-over in the morning. The stench of dead bodies is awful. This is truly a terrible place. The Somme was only a flea-bite in comparison with it. The famous Messines Ridge rises in front of us. Our objective is a hill on the further side of it, and to the right of Polygon Wood. p.108The 54th Battalion established its headquarters in a former German pillbox in Glencorse Wood, around 1,250 yards behind the front line. That night a heavy German barrage landed on what remained of the wood. Chaplain J.J. Kennedy of the 53rd Battalion described the bombardment: We arrived at the sunken road where the pill-box, our destination, was situated. Again we found damnable congestion. The 54th Battalion Headquarters were in occupation, so we had to share the place with them ... We had barely settled into our new positions when the most violent bombardment I have ever experienced commenced. A heavy shell got a direct hit on our pill-box. The explosion killed a signal sergeant who was engaged with the buzzer near a window. Two others out in the trench at the time were killed. All of us inside were thrown violently to the ground, so we thought 'twas the end of things.Further adjustments to the brigade frontage were effected when the brigade took over 100 yards of the front line occupied by the 4th Brigade on the left. During the evenings prior to the attack, patrols from the 14th Brigade went out into no man's land and managed to push as far forward as the Butte, visible ahead in the remains of Polygon Wood. On the evening of 24 September, the jumping-off line for the attack was staked out and, at dusk on 25 September, the tapes marking the jumping-off lines were laid. Each company in the assaulting battalions was allocated a rectangle in which to assemble prior to the attack. Tapes were also laid back to the Glencorse Track to enable the troops to find their way forward. Once the troops were assembled, the tapes were rolled up to avoid detection by the enemy. As a precaution, the 14th Brigade had decided to compress all 12 waves of the attacking battalions in the assembly area so that they occupied a depth of just 60 yards. At 4.00 am German artillery began to fall on the area just behind where the 14th Brigade was assembled, although it inflicted no casualties. A small covering force from the 54th Battalion occupied a line of shell holes forward of the assembly area to ensure that the enemy did not interfere with preparations for the assault. Once the leading battalion, the 53rd Battalion, was in place, the 54th Battalion moved into the brigade reserve behind the attacking troops, although many of the men in the covering force joined the assault following behind the 53rd Battalion as it advanced. At 5.22 am the 14th Brigade reported 'all correct' to 5th Division Headquarters. p.108 At zero hour the British barrage descended and the attacking battalions rose and closed to within 60 yards of the barrage. After the battle the troops praised the barrage as one of the best that had ever protected Australian troops going into battle. The dry ground combined with the smoke from the shell bursts to create a wall which rolled ahead of the troops 'like a Gippsland bushfire'. However, it was difficult for the leading troops to discern the edge of the barrage and they had to take care not to advance into the barrage itself. The wall of dust and smoke combined with a thick morning mist, reducing visibility to just 15 yards, which also made maintaining direction difficult without the use of a compass. The troops of the 53rd Battalion shook out into their formation and then knelt, waiting for the barrage to begin its advance. p.108 As they had been trained, the leading sections advanced in single file, preceded by scouts. Resistance from enemy strongpoints and pillboxes was encountered almost immediately the barrage began to move forward. As soon as they were identified, German positions were targeted by Lewis gun or rifle fire while parties worked around the flanks to clear them out using bayonets or grenades. On reaching the Butte, which lay in the 14th Brigade's sector, two platoons previously detailed for the task rushed the position. The Australians established themselves on top of the Butte after a short fight and then placed sentries on all the entrances leading into the |
| More information 2: continued |
|
feature. Several bombing parties then began to work their way inside. The Germans
trapped inside the Butte resisted and the bombing parties were greeted with grenade and
rifle fire. While most of the Germans surrendered, on several occasions the Australians
were forced to use grenades to 'encourage' the German defenders to lay down their arms.
The attacking platoons captured two officers and 56 other ranks during the fighting for
the Butte. Shortly after the feature had been cleared, the Germans launched an immediate
counter-attack to retake the position which the 53rd Battalion easily repulsed with Lewis
gun and machine-gun fire, capturing a further 20 prisoners including another German
officer. By 6.25 am the 53rd Battalion had reached the Red Line where it began to
consolidate its position under the protection of the barrage. p.110
The 53rd Battalion positioned several Lewis guns on top of the Butte which offered excellent command of the surrounding area. Parties from the 14th Brigade Machine Gun Company also installed themselves on the Butte and 'rendered invaluable service in assisting to beat off all threatened counter-attacks'. Battalion headquarters was established in the German dugouts in the Butte itself and one and a half companies of the 53rd Battalion used the feature as cover while serving as the battalion reserve. As they were consolidating their position, they were subjected to heavy fire from German machine- guns and snipers forward of the Australian position. Enemy aircraft were also observed flying low over the British front line. The 53rd Battalion despatched several patrols which successfully dealt with snipers frustrating efforts to consolidate their position. Two aid posts were also established at the Butte and, once the available stretcher- bearers had been exhausted, casualties were collected to await evacuation. This lasted until the following morning when the 53rd Battalion's Regimental Medical Officer moved up to battalion headquarters with a further 20 stretcher-bearer parties to finalise the evacuation of the wounded. p.110 By 8.50 am contact had been established with flanking units and, under the protection of the barrage, consolidation proceeded rapidly. By 11.17 am the 14th Brigade reported that it had established 'a formidable system of trenches' and was ready for the expected German counter-attack. Both the 55th and 56th battalions had reorganised after capturing their objectives and, by mid-morning, were holding the front line with two companies each, a further company in support and another in reserve. The 56th Battalion established its headquarters at the Butte while 55th Battalion Headquarters planned to move to the Butte later in the day. Forward Observation Officers had also moved forward and adjusted the SOS barrage line to within around 200 yards of the Blue Line in anticipation of German counter-attacks. p.113 At around 4.00 pm the 14th Brigade observed German troops massing for a possible counter- attack, moving from pillbox to pillbox. However, no counter-attack materialised on the 14th Brigade's area of the front. At 7.00 pm the enemy was seen to be massing again and several hundred German troops were observed crossing the skyline in small groups. At 7.15 pm the Germans advanced in attack formations and three waves were seen approaching the British line. British guns responded quickly and those enemy troops not caught by the artillery were targeted by Lewis guns and machine-guns from the Australian lines. The 14th Brigade reported that no enemy troops reached its front line at any point. No further enemy counter-attacks were launched against the 14th Brigade and, as evening fell, the German artillery fire abated. Patrols moved forward into no man's land and wiring parties began constructing lines of wire obstacles forward of the front line. By morning on 27 September the whole of the 14th Brigade front line was covered by a double line of French wire while almost all of the support line was shielded by a single apron line of wire. p.113 Source: Passlow, Jonathan, The Battle of Polygon Wood 1917, Australian Army Campaign Series – 19, Army History Unit, 2018 |
|
 |
|||||||
| This page was created by Richard Crompton and maintained by Chris Glass |
 |
Version A6 Updated 09 June 2023 |
||||||


