 |
 |
| Above: Lyle Blackman in 1909. Family photograph - Source: Heather Schoffelen | |
| Right: Lyle Blackman in 1911. Family photograph |
1821 Info 11c for Caleb Crompton |
Lyle Aubrey BLACKMAN's early life
Lyle Aubrey, William and Frances' ninth child, was educated at Miners Rest State School, where he and his brother Tom were awarded prizes at the end of the Christmas term 1896. 1 Later he attended Ballarat State School and Grenville College (Alumni Sir Robert Menzies 1908-09 12th and longest serving Prime Minister of Australia). In the 1906 Electoral Roll, Frances was living at 88 Barkley Street, Ballarat East on home duties. William was not recorded in Ballarat. However, Lyle still had connections with Miners Rest by helping to organise the 1912 Bald Hill Tennis Club's concert and dance. 2 On 24 March 1914, Lyle was playing for the Ballarat North club losing his doubles match against Quarry Hill club, Bendigo.
The Australian Electoral Rolls for 1903-1914 shows:
|
|
| Above: Lyle Blackman in 1909. Family photograph - Source: Heather Schoffelen | |
| Right: Lyle Blackman in 1911. Family photograph |
where he remained registered throughout the War.
Lyle and his cousin John Reginald both joined the famous 8th
Battalion (8/Bn), when it recruited from Ballarat and its environs. They are
both on the original battalion nominal roll when it sailed from Melbourne, on 19
October 1914, on HMAT A24 Benalla.
|
 |
| Above: Lyle Blackman's shoulder patch of 8th Battalion, AIF |
| Lyle's Attestation Papers 3 show he had been in the 7th AIR for 3½
years with a further 2 years and five months in the 71st Battalion of the Militia as a
Second Lieutenant. On joining the 8/Bn Lt. Col. W Bolton commanding recommended Lyle to a
full Lieutenant.
Right: LA BLACKMAN in the uniform of a second lieutenant, of perhaps, 71st Bn City of Ballarat Regiment. The photo was taken before embarkation: in 1914 Australian units were short of uniforms and the diagonal Sam Brown belt. Officers were provided Khaki shirts in France or just before leaving Egypt. Source: Austin, page 202 Below: Lyle Blackman as an officer of the Victoria 71st Bn in 1912 - back row second from left. Note also Eric Brind who was Nelson Wellington's best man, middle row, extreme right Source: Victoria Collections |
 |
 |
The 8th Battalion was among the first infantry units raised for the AIF during the First World War. Like the 5th, 6th and 7th Battalions, it was recruited from Victoria and, together with these battalions, formed the 2nd Brigade. The battalion was raised in rural Victoria by Lieutenant Colonel William Bolton in the third week of August 1914 and embarked just two months later. After a brief stop in Albany, Western Australia, the battalion proceeded to Egypt, arriving on 2 December.
 |
Left: Men of the 2nd Australian Infantry Brigade walking down the Port
Melbourne pier to embark on HMAT Benalla (A24) (right), and HMAT Hororata (A20) (left),
for service overseas.
Source: Australian War Memorial (AWM) Ref: C02793 |
| In theory the voyage should have been a trip of
some luxury. The 11,118 tons, 14 knot Benalla had been delivered to P O,
for UK/Australian emigration via The Cape, in February 1913. She had been requisitioned
as the Australian Transport A24 in September 1914.
Interestingly, in 1927, the Benalla took the first load of steel for the construction of Sydney Harbour Bridge. Right: HMAT A24 Benalla Source: AWM Ref: PB0246 |
 |
Mena Camp, Egypt
| The Benalla berthed at Alexandria wharf on 8 December 1914. The 8/Bn
disembarked and immediately boarded special troop train on the 100 mile (160km) journey
across the Nile delta to Cairo. The train arrived at 2030 hours amidst heavy rain and to
an evening meal of a cheese bun and a cup of cocoa. The battalion had to wait several
hours before being crammed into trams for the 12 mile (20km) journey to the sandy and
inhospitable Mena Camp, arriving in the early hours. From the 8/Bn lines could be seen a
100 foot (33m) cliff some 200m to the east, above which were pointed the tops of three
pyramids. Within a couple of days the training routine of drill, musketry, tactical
training and route marches, began.
Right: 8/Bn at Mena Camp Source: Austin |
 |
 |
From 14 December, twenty percent of the battalion was granted leave on a daily
basis to go into Cairo for the liquor and women.
The officer's mess was set up in a large marquee complete with wooden floor, piano, easy chairs and potted plants. Each officer had to pay 30 shillings a week towards mess maintenance and food: the food being supplied by a French firm from Cairo. Left: Lyle's No 5 Platoon, 8/Bn at Mena Camp |
| By the end of January 1915, the troops were well practiced in advanced guard formation and attacks for the large Turkish force that threatened the Canal and Cairo. On 4 February 1915, the 8/Bn became the Ismailia reinforcements with the excitement of moving up to the Canal. Operation Orders, later aborted, detailed half the battalion to be the flying column's advanced guard to pursue the Turks across the western Sinai Desert. February involved route marches, trench digging, attack and defence exercises. From these experiences, the 8/Bn cherished the belief that they had originated the famous nickname 'Digger Soldiers'. On 24 February 1915, the whole battalion 'holidayed' and Cairo was subjected to an invasion as the men had 'the best of times'. |  |
| Above: 8/Bn return to Mena Camp from their detachment to the Canal Source: AWM C01928 |
As the weeks passed the emphasis of training changed from drill to tactics within the area designated for 8/Bn training some five miles (8km) from the camp, over a dusty, soft, sandy desert. In the New Year, training focused on trench digging, outpost duty and defensive exercises. The blanketless cold bivouacs proved unpopular.
 |
Left: Lyle Blackman in Egypt between December 1914 and April 1915, prior
to Gallipoli. Source: AWM P11627.003. In early 1917 Lyle commanded No 5 Platoon, ' B' Coy, 8th Battalion (Ref: National Archives of Australia (NAA) B2455 p.59 Australian War Memorial (Accessed: 15 July 2017) |
After the special Good Friday church service many of the men were granted leave to go into Cairo. This large influx of soldiers into the brothel streets of Haret el Wasser brought about the infamous First Battle of Wozzer' between the Australians and the Egyptians. On 2 April 1915 the festering bitterness regarding the activities of the liquor traders erupted into violence. However, it had already been decided to transfer the Australians to Lemnos as part of Hamilton's Mediterranean Expeditionary Force. On 4 April 1915, the 8/Bn struck camp at 2000 hours and marched into Cairo. The first troops reach Alexandria at 0800 on 5 April, where they were transferred to the small and dirty troop ship Clan Macgillivary. The ship sailed at 1700 hours on 8 April.
Gallipoli
Two days later, after experiencing a rolling ship in heavy seas, land was sighted and the Clan Macgillivary anchored in Mudros harbour. 4
On 05 April 1915 8th Battalion embarked to join MEF in the Gallipoli Campaign in MV Clan Macgillivary from Alexandria and took part in the ANZAC landing on 25 April 1915, as part of the second wave.
[...] the 8th Battalion which was on board the Clan Macgillivray, had been aroused at about 3.30 am, and commenced their breakfast of hot bully beef stew a half an hour later. The order to "Fall in on deck" soon had soldiers scurrying everywhere, particularly as some of the men were still eating their stew. 5Left: The 6447 ton Clan Macgillivary built in 1911 |
 |
 |
| Above: The Clan MacGillivary at the Gallipoli landings |
The original plan was for the 2nd Infantry Brigade to come ashore, immediately after the 3rd Brigade had safely landed. Colonel McCay's [Later Lt. General Sir James McCay commanding 5th Division at Fromelles] battalions were to quickly move into position on the left of the 3rd Brigade from Baby 700 feature to Hill 971, with the role of protecting the left flank as far north as Fisherman's Hut.
The companies quickly lined up on the deck and waited for further orders. The shelling from the accompanying battleships and the zing of stray enemy bullets passing overhead, reminded the men, now so strangely silent, that their war was about to begin in earnest. A British destroyer came alongside and the battalion climbed down the swaying rope ladders and filed onto her waiting decks. As the destroyer steamed closer to the shore, the men could see the scrubby hills in front of them. The destroyer stopped and the troops then climbed down into several barges being towed by a rowing boat commanded by a young Royal Navy midshipman. The tiny convoy was then towed over the glass-like water by a steam pinnace. 6
The 8th Battalion landed in three groups, the final companies landing at 10am. McCay ordered them to defend Bolton's Ridge, named after Lt. Col WK Bolton CO 8th Battalion, against a southern counter attack. Bolton's Ridge lead to the 400 Plateau, on which stood the Lone Pine. The 8/Bn were in position around 9am by which time 6th Battalion were advancing towards the third ridge objective. Despite the confusion of battle, two companies of the 8/Bn advanced and reached the shoulder to the south-east of Lone Pine and moved, in isolation, beyond Owen's Gully. The scrub gullies and spurs broke the troops into small parties, preventing the formation of an Australian line. In the late afternoon the scattered Battalion was withdrawn to Bolton's Ridge.
The men of (Lyle's) B Company had "followed the Turk back inland for almost a mile over very hilly country - hills and dales covered with low prickly bushes." There was great confusion as the 8th Battalion tried to form a firing line while under enemy fire [...] ready to repel any counter attacks. 7
| By 1.30pm Col. McCay was seeking reinforcements to hold onto 400 Plateau and Lone Pine in the face of any major counter attack. However, reinforcements were not available. The scattered units on Knife Edge, were under shrapnel fire and begun to deepen their trenches. On several occasions the Australian moved their straggly line forward only to have to retire. At 4pm, McCay ordered the 8th Battalion to extend their line onto 400 Plateau itself to plug a gap in the brigade's position. Reinforcements arrived just before dusk to bolster the precarious position. The proposal to withdraw was rejected by General Hamilton. The 8th Battalion was told to 'dig' and defend the western part of 400 Plateau and the rear edge of the Wheatfield to the sea. Three attacks across the Wheatfield were made before dawn: the first was countered by rifle and machine gun fire, the second by a bayonet charge and the third by withering fire. The next morning the 8/Bn continued its consolidation, interrupted only by sniper fire. |  |
| Right: Map locating 8/Bn's positions on 400 Plateau |
Had Colonel Mustafa Kemel launched a major counter attack, the Australians were in danger of being thrown back into the sea.
On Monday 26 April 1915, despite snipping and shelling, the 8/Bn continued to consolidate their line aided by the arrival of three 18 pounders of 7th Field Artillery on Bolton's Ridge. On the night of 27 April 1915 the shrapnel fire from these guns cut swaths through the Turks attacking through the wheatfields. On the night of the 29th, whilst the other battalions were relieved by the Royal Marines, the 8/Bn, being well organised, maintained their position being well supplied with wither, food and ammunition. The 8/Bn were relieved by the 11th at 09.30am the next day, moving to the reserve position on the beach in time for a swim. After a spell of fatigues, digging and swimming, the Battalion returned to the front, to the left of their previous position on the 30th.
During the five days of the landing the 8/Bn had lost 3 officers and 21 Other ranks (OR) killed, 8 officers and 136 OR wounded and 1 officer and 50 OR missing. 8
Second Krithia
Ten days after the landing, on 5th May, the 2nd Brigade was transferred from ANZAC to Cape Helles to help in the attack on the village of Krithia.
The British landings around Cape Helles had also failed to achieve their objectives. Accordingly, 8/Bn Battalion received hurried orders to move by sea on the torpedo-boat destroyer Bulldog to land at Helles against the River Clyde at 0700 on 06 May and then digging in at Sedd el Bahr. From their vantage point, over looking lush rolling hills reminiscent of Victoria, the 8/Bn in reserve, watched both attacks of 07 May fail with considerable casualties. However, at 0900 on 08 May McCay ordered the 2nd Brigade to move forward equipped with extra ammunition.
 |
| Above: Helles Peninsular Source: Bean |
 |
Left: Location of Krithia
Key Dere - stream Nullah = dry stream bed ADS and CCS positions are approximate Based on: The New Zealanders at Gallipoli Chapter IX, The Battle of Krithia, Fred Waite 1919 (Accessed: 15 October 2019) |
The 8th Battalion, accompanied by the stretcher bearers of 2nd Field Ambulance, dug a defensive position in the rear of the brigade to the west of Krithia Nullah creek bed. The brothers Lyle and Tom were together. Following fruitless attacks, General Hamilton used precious reserves and ordered 2nd Brigade to make and unprepared attack at 1730 on the right flank and capture Krithia and Achi Baba, with the 8/Bn in reserve. Shortly after 1730 'A' Coy of the 8/Bn advanced in single file in support of the 6th. In the confused advance the other part of ' A' Coy and Lyle's 'B' Coy found themselves in the centre of the brigade advance. By 1830 the attacked, which had, at 600 yards (550m), the furthest gain of the afternoon, had failed and by 1900 the troops were back in their trenches. During the night trenches were deepened in anticipation of a Turkish counter attack that never materialised. The aftermath of the charge left dozens of wounded men exposed to Turkisk rifle fire and searchlights. During the night 2nd Field Ambulance were busy bringing in wounded from No-Mans-Land and carrying them 6000 yards (5.5km) to the Advanced Dressing Station (ADS) and then on to Casualty Clearing Station (CCS) at Cape Helles. During the night of 11 May the 8/Bn Battalion was relieved by the Lancashire Fusiliers was completed at 0500 the next morning. The unit War Diary 0f 24 May 1915 (Accessed: 23 July 2017) records that Second Krithia coast 8th Battalion Killed 5 Officers 53 OR, Wounded 11 Officer 240 OR, Missing 1 Officer 73 OR, Total 17 Officers 371 OR, or 45.6% of the roughly 850 strong battalion.
 |
Left: Second Krithia - sketch of disposition of 2nd Brigade troops
along the central spur 08 May 1915
Adapted from Austin, The White Gurkhas The map shows the close proximity between the disposition of Lyle's 8/Bn and his brother Tom's 2/Australian Field Ambulance. The attack captured little ground but cost the brigade almost a third of its strength. The period of reorganisation ended on 16 May when 2nd Brigade was ordered to return to Anzac on the Ionian. ...it should be acknowledged that the performance of 8th Battalion during the advance on Krithia was less than brilliant. There was great confusion as to where the companies would go, and this confusion was exacerbated by as series of vague orders issued during the battle. A quarter-master sergeant of a sister battalion observed about 100 men of the Eighth who remained under shelter during the entire battle, an action which badly tarnished the reputation of the 8th Battalion within the 2nd Brigade. 9 |
Back to Anzac
The Victorian battalions returned to ANZAC to help defend the beachhead.
The return of the 8th Battalion to the deadly hills of Anzac, provided little opportunity for rest. As soon as the men disembarked they were directed to a bivouac in White Gully. That evening the threatened Turkish attack required the entire battalion to ' stand to' several times during the night , following a heavy artillery bombardment by the Turks at 5pm. The Turkish attack on much of the Australian firing line commenced at 3am on 19th May, but the only successful incursion was at Courtney's Post. 10 The sound of continuous rifle fire which had the men on edge, abated an hour or so, and by 5am it was clear that the enemy attack had failed, and that 8th Battalion would not be required for any counter attack. 11
On 21 May an armistice was arrange for both Turks and Australian to bury their dead. ' B' Coy was involved. The next day Lt. Vol. Charles Bond DSO assumed command. In between lightly trench digging in Shrapnel Gully and moving stores the Battalion acted as relief for those units at the front. It was a rota of two days at the front and two days on working parties based on their White's Gully bivouac. Steel's Post was one position garrisoned. It was there that the Battalion was inspected by Generals Birdwood and Walker on 15 June. The following day the Battalion took heavy shelling that damaged trenches and endured constant and accurate sniping that accounted for four dead and nine wounded. In August the 2nd Brigade fought at the battle of Lone Pine.
Lyle then succumbed to a bout of sickness. His service record shows:
 |
However the War Diary records Lieutenant Blackman returning from hospital on 08 August 1915, just in time for the 8/Bn's supportive role in the battle for Lone Pine. In the battle the 8/Bn sustained at least 50 fatalities.
 |
On 07 September 1915 the 8th Battalion were officially relieved by the newly arrived 21st Battalion. About half the battalion stayed in the trenches to enable the newcomers to settle in. I wonder whether Lyle met his brother-in-law Lieutenant Nelson Wellington.
At 8 pm on the night of 9th September, 8 officers and 278 men of the 8th Battalion under the command of Major Eberling, boarded the minesweeper Sarnia which safely transported them the 60 miles to the Greek island of Lemnos. It is not hard to imagine the feelings of the men as their vessel steamed into Mudros Harbour on the following morning. As the harbour was crowded with warships and other vessels, it was not until 9.30 am that the troops clambered down onto the launch Water Witch for the quick trip across the harbour. Once disembarkation was complete, the battalion set out on the five mile march to the camp at Sarpi. Unfortunately, most men were now physically weak from the lack of regular exercise, sickness and poor diet, and this meant that the long march caused severe distress to men who had not marched or carried a pack in four months. Upon arrival the troops found they had been allocated 17 marquees as sleeping accommodation[. U] unfortunately this comfortable state of affairs did not last for long, as two days later, half of the marquees were reallocated to another unit, which meant that many of the men had to sleep out in the open. For the first few days of their rest at Sarpi, the men were free to roam around the island, visiting the small villages and quietly robbing the local inhabitants of their
produce. Although Lemnos lacked the temptations of Cairo, nonetheless once the men were paid 'they made things lively while it lasted.' ... The pattern of training and sports was to continue for the next few weeks as the battalion was gradually restored to health. 12
| All above: Extracts for 8th Battalion's War Diary |
The battalion served at ANZAC until the evacuation in December.The 8th Battalion evacuated Anzac at 2100 on 18 December 1915 on SS Abbassia arriving at Mudros at 0300 before disembarking to Sarpi Camp.
End notes
On the Western Front
| After the withdrawal from Gallipoli, the battalion returned to Egypt. In March
1916, it sailed for France and the Western Front. From then until 1918 the battalion
was heavily involved in operations against the German Army. The battalion's
first major action in France was at Pozieres in the Somme valley in July 1916. Private
Thomas Cooke, one of 81 members of the battalion killed at Pozieres, earned a
posthumous Victoria Cross during the action. After Pozieres, the battalion fought at
Ypres, in Flanders, returning to the Somme for winter. In 1917, the battalion
participated in the operations that followed-up the German withdrawal to the
Hindenburg Line, and then returned to Belgium to join the great offensive launched to
the east of Ypres.
Right: Lyle Blackman in London 29 March 1916. The photograph was taken two days after a medical board, in London, found his 'fit' and with 'negative tests'. This may have been the result of a case of dysentry that sent him to 3rd London General Hospital on 11/11/1915. 1 |
 |
The action at Polygon Wood - 20 September 1917
Bean's Official History makes a general references to the 8/Bn action when JR BLACKMAN won his Military Cross.
'The 8th Battalion, on far right, advance to the Green Line occupied in most parts only a few minutes. Everyone expected resistance at the points from which fire had been coming during the pause, and, if the Germans there had now been ready to come into the open, taking all risks, they could have caused great trouble. But the renewed impact of the overwhelming barrage had dissipated any such tendency. As the line advanced the enemy appeared glad to surrender. From the row of pillboxes north of the Reutelbeek, Germans came running to give themselves up to the 8th Battalion.
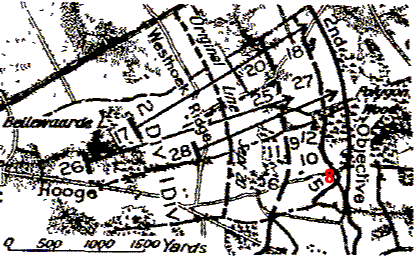
On the ridge itself, when the barrage died down, the thin stumps of Polygon Wood, shimmering in the noon-day heat above a wilderness of brown shell holes, showed in most parts no sign of movement. From the grim mound at its farther end a few figures, apparently observers, were hunted off by Lewis guns and by increased shelling.' 5Right: Map location action of 8/Bn 20 September 1917 in the Battle of the Menin Road |
 |
|---|
|
|
This icon opens a Word document, adapted from Bean. It gives more information about the Battle of the Menin Road and mentions the part played by the 8th Battalion. |
|
|
This icon opens a Word document. The 8th, along with the 5th , 6th and 7th Battalions formed the Second Brigade of the First Division. This account, describing the part played by the 5th Battalion in the Battle of Polygon Wood and gives a flavour of what the 8th would have experienced. |
From the 12 September 1917, the Battalion moved up to the front in preparation for the attack.
| WAR DIARIES or INTELLIGENT SUMMARY | |||
|---|---|---|---|
| Date | Place | Time | Summary of Events or Information |
| September 12 |
LE DOULIEU | Battalion marched to VIEUX BERQUIM | |
| 13 | Battalion moved to REINGHELST | ||
| 14 | In camp at REINGHELST | ||
| 15 | / |
Moved to CHATEAU SEGARD } BUND DUG OUT } Narrative IN ACTION } Appendix |
|
| 22 | Battalion moved by Motor Vehicle to STEENVOORDE Bn HQ | ||
J.W. Mitchell Lieut. Col Commanding 8th Battalion AIF |
|||
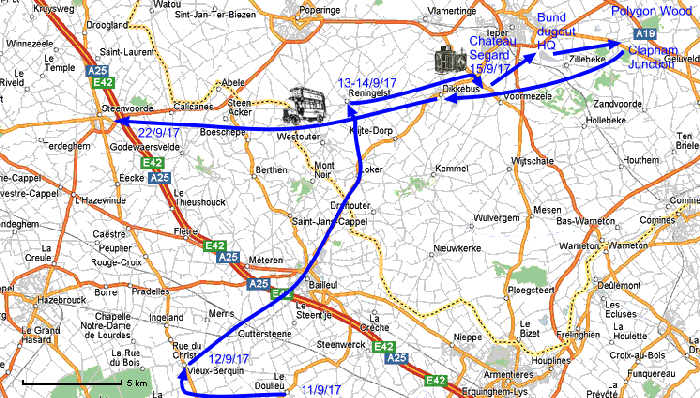 |
| Above: A map showing the approach march of 8/Bn toward Polygon Wood. Today Carlisle Farm (below) is just to the north of the A19 motorway, south of Polygon Wood map ref: 28NE3 J.15.b.2.3 - approximately under the 9 |
|
| 1 | 2 | 3 | 4 |
|---|

|

|

|

|
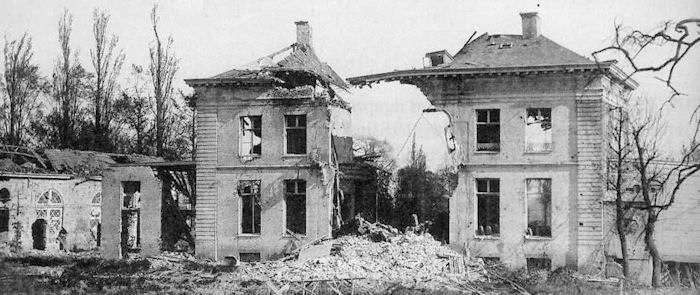 |
| Above: Chateau Segard, the HQ for many formations which fought
at Polygon Wood. It was severely damaged in the fighting of April 1918. 6 |
 |
| Above: A map, of unknown date, locating Chateau Segard and Cafe Belge - highlighted 7 |
The 8/Bn's War Diary and the medal citation gives more detail of Jack's Military Cross action. The Battalion's Battle Narrative records JR BLACKMAN's action, as the '1 Officer'.
| APPENDIX | |
| 8th Battalion A. I. F. | 19/22nd September 1917. |
| -:-:-:-:-:-:-:-:-| SUMMARY OF OPERATIONS |-:-:-:-:-:-:-:-:- | |
| 20/9/17. | ... At Zero Hour 3-1/2 Coy's had cleared CLAPHAM JUNCTION and 3 Coys were on the Tape Line. The whole Battalion moved when the Brigade moved forward but owing to the heavy casualties and delay caused by Troops not being quite into position direction was not too well kept up to the FIRST OBJECTIVE and touch was lost with the Battalion on our right; this, however, was gained before reaching Sec nd [sic] Objective and maintained throughout the Operation. At CARLISLE FARM 1 Officer and 4 men attacked and captured a Strong Point from which they had been subjected to Machine Gun Fire. In this Post they secured as prisoners 4 Officers and roughly 30 Other Ranks, together with 3 XXXXXXXXXXXX Machine Guns. ... |
| 23/9/17 | RIFLE STRENGTH -
CASUALTIES - RIFLE STRENGTH - |
19/9/1917.
21 Officers 740 Other Ranks. Killed 4 " 40 " " Wounded 8 " 160 " " Missing 13 " " D. of W. 6 " " 22/9/17 11 Officers 521 Other Ranks. 8 |
| 2nd Brigade Preliminary Orders, Appendix XC, recognised Carlisle Farm at J.15.d.3.9,
as a strong point on the Green Line.
It was to be captured and converted into an Australian strong point.
Right: Trench map of Carlisle Farm - German trenches in red Source: Gheluvelt 28 NE3 of 30-6-17, WO297/738, TNA, Kew, London Click on the image to open an A4 landscape map of the wider area showing movements and positions 9 |
 |
| Appendix XCIV
Headquarters 2nd Aust. Inf. Bde. 23rd September 17. |
| Narrative of operations from 19th to 21st September 17. ------------------------- |
| -:-:-:-:-:-:-:-:-| SUMMARY OF OPERATIONS |-:-:-:-:-:-:-:-:- |
| 20th Septr. 21st Septr. |
0540 0642 0816 0835 0910 0930 1100 1226 1620 1646 1707 1900- 2400 |
Zero hour, our BARRAGE opened punctually quite
dark. 6th Bn. reported RED Line captured. 6ht Bn. HQ at L. Farm RED Line consolidated 8th Bn. reports progressing with our rear BLUE Line - casualties slight - prisoners good number - one battery 18 pndr. shooting short - Lift barrage 200 yards. RSM 2nd Aust. Div. reported their men consolidating on BLUE Line, Left Bde [inc. 8th] reports troops for attack on GREEN Line ready on BLUE Line. Left Bde. in touch on both flanks - Casualties slight 8th Bn. report lift whole barrage 500 yards, will have to retire if not done soon - in touch with YORKS on right. 8th Bn. report consolidating GREEN Line, estimated casualties 4 Off. 100 O'Ranks F.L.O. report enemy massing at J.10.C and J.16.A.5.6 [Cameron House] F.L.O. report enemy removing guns at J.16.A.10.65 [Cameron House] Artillery informed 8th Bn. report Patrol ascertained that flares were sent up in forward position by not by them 8th Bn. report having taken S[trong] P[oint] J.15.B.8.1. move barrage to JUT FARM Relief by 1st Aust. Inf. Bde 7th and 8th Bn and Brigade Hqrs to DICKEBUSCH report 8th Bn. / having sent up S.O.S. 1910. As there was considerable movement of hostile troops in sections in artillery formation in front of sector - S.O.S. had previously been sent up by Bde. on left - Artillery broke up what certainly appeared to be an organised counter attack. |
| Above: A compilation of 2nd Brigades Battle Narrative War Diary Appendix XCIV 10 |
The Battle at Rosiéres - His Military Cross action
The Battle of Amiens began on 08 August 1918 where Lyle Blackman won his Military Cross. The nominal roll for 29 July 1918 shows that Lieut. LA BLACKMAN headed the list of 'A' Coy officers as Company commander. He is not listed in the Nominal Rolls for August and September 1918.
| On 8 August 1918, the 8/Bn, with a strength of 26 officers and 680 OR, was bussed to Querrieu, 14km north-north-west of Villers Bretonneux. At 1630 hours the battalion marched 9km to Aubigny. At 0845 hours the next day, they began a 16km cross country march to its rendezvous west of Harbonniéres on the 2/Brigade’s right. Within 8/Bn, Lyle and ‘A’ Coy were on the battalion’s right, against the railway, and ‘D’ Coy on the left. The plan was for 8/Bn to attack, with 14 tanks, the little village of Rosiéres, with 7/Bn attacking Rosiéres hill on its left and the 6/Canadian Brigade on its right. If the village and hill were easily taken, to capture Lihons a further 5km east. The railway was the battalion's right boundary. |  |
The late Professor Richard Homles writes that:
Haig [...] visited [General Sir Henry] Rawlinson just before the attack and told him to aim at going far deeper. The line Chaulenes-Roye, 7 miles (11km) beyond Rawlinson's final objective was to be taken and Ham, another 15 miles (24km), was the general direction of the advance.
The long approach march over flat open land, under a bright sun, meant that it was impossible to attack at the original 1300 hours. At 13.45 hours the 8/Bn changed into battle formation of section columns. When approaching Rosiéres railway station, they came under intense machine gun and artillery firing on open sights from Rosiéres hill, putting the tanks out of action. The brief and costly battle turned into an infantry action with a series of section rushes using fire and movement and a bayonet charge, which prompted the Germans to evacuated Rosiéres leaving stores, 30 machine guns, and a 6” railway gun. ‘The Victorians were too tired to give chase. They had fought for a mile and a half after a hot, dusty march of a dozen miles loaded with battle-kit, extra ammunition (220 rounds SAA and two hand grenades), greatcoat, waterproof sheet, and two days rations, and had eaten only such food as they could snatch in the short interval at Bayonvillers or Harbonnieres.’ 2
Stubborn enemy defences caused Brigadier General Hearne to ask Colonel Mitchell if the 8/Bn could capture Rosiéres hill. Mitchell agreed providing he could plan and time his assault. Of the 3500-yard (3.2km) advance, Colonel Mitchell later wrote:
The whole advance had taken place over a long flat plain ending in a prominent rise – the ideal ground for defence and very difficult for attack since the movement of every individual could be observed. In addition to this there was no artillery support. The mobile 18-pounder brought up to deal with the ridge was completely put out of action after firing three shots. Therefore the fight was purely an infantry one against odds in the shape of well concealed machine guns and spaced field guns. 3
By 1600 hours all companies were in line. The right flank was confronted by some isolated enemy machine gun posts, which, without their tanks, were quickly and methodically removed by Blackman and one of his platoon commanders unaided. By 2000 hours the tired battalion was consolidating the red line in front of Lihons where the spirit of the men, their Lewis Guns and a bayonet charge prevented two attempted right flank counter attacks, of 300 and 400 men to the recapture the battery of 77s. There were considerable German casualties. As the Canadians had failed to come up, ‘A’ Coy’s right exposed flank was swung back to link.
Most of Blackman's officers became casualties, frequently by sniper, and when Blackman was wounded in both legs, the shoulder and arm, he could have been excused any further participation in the action. However, he continued to fight with his company, even leading a bayonet charge, before, on the 10th, his CO ordered him to the RAP.
 |
| Above: Rosiéres battle map 8/Bn War Diary August 1918
p.33 Click on the map to open a scalable pdf map of the battle detail in a new window |
 |
| Above: French trench map Rosiéres for the attack of 05
December 1916. Lyle's attack would be north of the railway line. Click on the map to open a scalable pdf map of the battle detail in a new window |
The following extracts from the War Diaries of 8th Battalion records LA BLACKMAN's award. 4
| WAR DIARIES or INTELLIGENT SUMMARY | |||
|---|---|---|---|
| Date | Place | Time | Summary of Events or Information |
| 20/10/18 | Villers-sous-Ailly [Somme] | Advice received from Division that a number of officers of this battalion had been
awarded honours. Capt. LA Blackman - Awarded Military Cross. |
|
(Adjutant) |
|||
| SUPPLEMENT TO THE LONDON GAZETTE, 1 FEBRUARY, 1919. 1723 | ||
| AWARDED THE MILITARY CROSS. | ||
|
Capt. Lyle Aubrey Blackman, 8th Bn., Aust. Infy. For conspicuous gallantry and determination during the attack north of Rosieres [-en-Santerre] on 9th August, 1918. He led the right forward company splendidly and secured his objective against heavy odds in face of intense machine-gun fire. Though wounded early in the advance he carried on and personally led several bayonet charges on enemy posts, setting his men a fine example which they were not slow to follow. |
Source: The Supplement to the London Gazette 1 February 1919, Issue 31158 page 1723 | |
The official recommendation for the award of the Military Cross records . 5
W6378/M755 500m
9/16 G S M.369
Army Form W.3121. |
|||||
|---|---|---|---|---|---|
| Unit | Reg. No | Rank and name | Action for which commended | Recommended by | Honour or Reward |
| 8th Battalion A.I.F. |
Lieut. Lyle Aubrey BLACKMAN |
For conspicuous and devotion to duty during the
attack North of ROSIERES on the 9/8/18.
Lieut. Blackman was in charge of the right forward company in the attack and showed courage and fine leadership during the operation. He personally lead his men throughout and when strong opposition was encountered he handled the situation with such sound tactics and dash that he secured his objective against superior numbers and very heavy machine gun opposition, with nominal casualties. Early in the advance he was wounded by a shell, in both legs, shoulder and arm but carried on. As there were other officer casualties in his company, his retirement would have somewhat embarrassed the situation. He, though suffering severely, personally lead several bayonet charges into German groups of posts and positions, setting his men a splendid example which they were not slow to follow. Though under heavy shell fire, he personally superintended the consolidation of his objective and carried on until the following day, refusing to go to the dressing station until personally ordered to do so by his Commanding Officer. Throughout the whole operation he frequently sent full and concise reports to the rear, advising the situation. Received 17/8/18 Passed 18/8/18 Recommed. J. Heane Brig. General Commanding 2ndInf Bde |
JW Mitchell Lt.Col |
MILITARY CROSS | |
Lyle's promotion to captain was confirmed on 27 August 1918 but he was confined to 3rd London General Hospital, from 28 August 1918, with wounds to right wrist, left shoulder and both thighs. He returned to duty 15 October 1918.
One of Lyle's company, Robert Matthew BEATHAM 1 was awarded a Victoria Cross in the action.
| Right: A letter confirming Blackman's MC sent to his father Source: Army records NAA |  |
Austin concludes that, although the enemy were soundly beaten during the three days, the battle for Rosiéres hill extracted a heavy toll, brought on in part by a lack of clear orders, coordination and liaison between various senior commanders. Rawlinson, Monash and Currie were unprepared for the rapid advance. Bean, claimed it was a battle ‘marked by extremely hasty planning’ and ‘a classic example of how not to follow up a great attack.’ 6 None the less the Victorians had given a good account of themselves in an infantry battle: the tanks had proved vulnerable and the artillery almost useless.
After the battle Lt. Gen Monash, commanding the Australian Corps, wrote:
But the booty comprised a large and varied assortment of many other kinds of warlike stores. The huge dumps of en¬gineering material at Rosieres and La Flaque served all the needs of the Corps for the remainder of the war. There were horses, wagons, lorries and tractors by the hundred, including field search-lights, mobile pharmacies, motor ambulances, travelling kitchens, mess carts, limbers, and ammunition wagons and there were literally hundreds of thousands of rounds of artillery ammunition scattered all over the captured territory in dumps both large and small. 7
 |
 |
The Ballarat Courier reports Lyle being wounded on
09 August 1918.
Left: Ballarat Courier 30 August 1918, page 4 |
End notes
Sources:
| More information 1 |
| Robert Matthew BEATHAM VC
Later in the action at Rosiéres Robert Matthew BEATHAM, a member of Lyle's 'A' company, won a posthumous Victoria Cross. The Battle Narrative in the War Diary only records general statements about the disposition of 'A' Coy during the action, and there is no specific mention of BEATHAM. Perhaps due to the confusion of battle, the London Gazette dates Beatham’s action and death as 9 August 1918, contradicting his grave marker, and on the 11 August, his battalion was in action near Lihons not Rosiéres. His citation records:
|
| More information 1 - cont |
| The relief of 8/Bn began at 2100 hours but was not completed until 0710
hours on 13 August, when the exhausted 8/Bn marched back to Rosiéres to rest
and sleep. Up until reaching the Blue Line casualties had been light but
during the counter-attacks the number of ORs killed or wounded increased
considerably with 19 OR killed, including Beatham.
The 24 8/Bn members, including Beatham, buried in the small Heath Cemetery on the main Villers Bretonneux-Peronne road represents the greatest concentration of 8/Bn burials, exceeding Pozieres. Right: Robert Beatham's original grave marker |
 |
End notes
|
 |
|||||||
| This page was created by Richard Crompton and maintained by Chris Glass |
Version A20 Updated 22 February 2024 |
|||||||


