1805 Info 8f John Henry Crompton
'Now all roads lead to France ...'
Now all roads lead to France
And heavy is the tread
Of the living; but the dead
Returning lightly dance:
Edward Thomas, 3 March 1878 - 9 April 1917 1
It is a wide road that leads to war and only a narrow path that leads home again.
Knox, Sir Alfred, With the Russian Army, Vol.1, Hutchinson, 1921
John Henry's first tour of duty in France
According to John Henry's Casualty Form - Active Service (Army Form B103) he proceeded
overseas during the night of Saturday 25 November 1916.
The Battalion left Amesbury in three trains, which arrived at
Southampton at 11a.m., noon, and 2p.m. respectively. Here in large sheds adjacent to the wharf we
remained waiting for darkness to fall. It was not advisable for transports to cross the English
Channel in daylight.
During the long hours that elapsed we consumed
countless buns and cakes, vast quantities of chocolate, fruit, chew-gum and other kinds
of edibles which were purchasable at the canteens in the sheds. We smoked countless
cigarettes and drank every kind of liquid available. This was the only relief we got
during the tedious and monotonous afternoon and evening.
At last the long weary wait came to an end and we gladly received, and cheerfully obeyed,
the order to "Fall in." Embarkation on the Channel transports started at 8 p.m.
and after a rough passage, Le Havre was reached the following morning (Sunday).
2
In snow and sleet the Battalion disembarked at midday to be greeted by a mass of French
civilian populations. A six mile march took them to the desolate 'Rest Camp',
where rows of discoloured and sodden tents stood in oozing mud. Dripping and leaking tents
provided an uninviting atmosphere of gloom and dejection.
Left: Postcard sent by John Henry CROMPTON to Alex POSTANS, date and postal
address unknown. Source: Alex POSTANS' letters
1805info8f, sheet 2
Above: Possible route of 42nd Battalion to Armentiéres
Fortunately this was an over night stop, for the next day the
Battalion marched down hill to the station for a 30 hour train journey in French
cattle trucks infamously labelled '8 chevaux, 40 hommes' . Bailleul
was reached at 3pm on the afternoon of Tuesday 28 November. 3
From there the Battalion route marched to Outtersteene arriving at 5pm. Training,
including marching, bayonet fighting and gas drill began the next day and lasted
until 05 December.
Above '8 chevaux, 40 hommes' rail
travel Source: 42nd Battalion War Diary November 1916 AWM4 23/59/1
Right: Photographs of '8 chevaux, 40 hommes' rail travel
1805info8f, sheet 3
The first of many transfers to hospital, whilst in the 'field', occurred nine days
later when on 04 December 1916 John Henry was transferred to hospital with dysentery, but was
admitted the next day with diarrhoea. Nine days later, on 13 December, he returned to duty. By
this time the Battalion and marched to Armentieres, via Bailleul, where they became 'F'
Battalion billeted in a 'Cotton Factory' in Rue de la Paix, with headquarters at 23 rue
Sadi Carnot.
Above: 42nd Battalion War Diary 06 December 1916
For Outtersten read Outtersteene
After the British occupation of Armentieres, between September 1914 and April 1918 the town
remained in German hands until finally liberated on 02 October 1918. At this point the town was
raised.
In everything connected with the spinning and weaving of linen
Armentieres ... was considerably in advance of Germany. Consequently, the Germans destroyed all
the mills, factories and metallurgical works, and what machinery could not be taken to pieces and
sent to Germany, they ruthlessly smashed.4
Hoverbox Photo Gallery - rue de la Paix,
Armentiéres - Author: 03 October 2007
This feature does not function correctly on phones and tablets
The old cotton factory still gives every appearance of the building where the 42nd Battalion
were billeted over Christmas 1916. From the rue de la Paix entrance courtyard, rooms of
whitewashed brick, now dark and dusty with age, are no longer used in the modern production
process. Even in the 'office', where friendly and helpful staff work with modern computers, it is
possible to imagine by-gone days. In broken French these ladies were intrigued to hear about a
past life. Whether this is the original building or a post war reconstruction depends on the
damage sustained between 1917 and 03 October 1918.
Hoverbox Photo Gallery - The cotton factory 5
billet, rue de la Paix, Armentiéres - Author: 03 October 2007
This feature does not function correctly on phones and tablets
Hoverbox Photo Gallery - 42nd Bn. Headquarters, 28
rue Sadi Carnot 6 Armentiéres - Author: 03 October 2007
This feature does not function correctly on phones and tablets
1805info8f, sheet 4
Above: Trench map of Armentiéres 36NW2 dated 10 January 1917
Source: TNA WO 297/872 7Click on
the image opens an A4 landscape image in a new window
Brahms commented that, whilst part of the town was the Front Line, the civilians ...
'carried on their various avocations, whilst cafes and
estaminets reaped a rich harvest from the constantly arriving and departing
troops. Little mademoiselles came round to our
billets in the cold dark hours of the wintery mornings with cakes and coffee, for which
they charged deux sous (two half pennies), and the young boys ... came to our subsiduary
(sic) lines to sell us the daily papers. ... Whilst here we made purchases of many kinds
of fancy goods such as lace and silks and elaborate post cards.'
Above An elaborate postcard Source: Alex
POSTANS' papers
In his early chapters, Brahms gives flavour to life of the 42nd Battalion in the
Armentieres nursery trenches in December 1916 and January 1917. However, the route to the
trenches, as described below, seems to have poetic licence as it is not the shortest route on the
map above.
1805info8f, sheet 5
The following day, Saturday, December 23rd, fifty per cent, of the
specialists, that is, machine-gunners, signallers, bombers, etc., of the 36th Battalion, then
holding the line, were relieved by the same number of specialists of the 42nd Battalion. The rest
of us made our initial entry into the front line trenches the next day. In the early hours of the
morning, before the dawn of Christmas Eve, under the cover of
darkness, we stole silently across Half-past
Eleven Square and Barbed-wire Square, which were enveloped in a blanket of snow. We were
loaded up with full pack and equipment and went steadily on until a large red building was
reached. This was called "The Gum-boot Store". Here every man was issued with a
pair of rubber boots which had to be returned when the term in the trenches was over.
These boots reached from the toes up to the thighs, and after a while, created a freezing
sensation in the feet.
Above: Armentieres Half Past Eleven Square in 1917
Source: AWM 8 ART92814
Hoverbox Photo Gallery - 42nd Battalion at Houplines - Source: AWM
This feature does not function correctly on phones and tablets
1. Houplines Gum-boot Store January 1917 Source: AWM E00117
2. 42 Battalion at Houplines December 1916.
Source: AWM E00107 3. Houplines Gum-boot Store January 1917 Source: AWM E00120
1
2
3
They seemed to accumulate as much moisture as they were designed to keep
out. This was due to the condensing of the perspiration from the body. Alongside of the Gum-boot
Store was a Y.M.C.A. canteen, where tea and biscuits could be obtained prior to entering the
trenches. The system of trenches in front of Armentiéres was eventually entered by a
communicating trench called Lunatic Lane, so named after the Lunatic Asylum which stood at the
head.
1805info8f, sheet 6
Hoverbox Photo Gallery - The way to the front today
- Author: 03 October 2007
This feature does not function correctly on phones and tablets
1. Armentiéres Barbed-wire Square,
now at the intersection of rue de l'Octroi and rue des Déportés in 2008
2. A modern front to the Asylum
grounds in avenue Gustave Dron, in 2007. Wings have been added to this building. The
Asylum grounds are a modern psychiatric hospital in
landscaped rows of barrack-like buildings. 9
3. A possible location of the Gum-boot store: a red-bricked building on rue General
Leclerc, in 2008. This is a best guess based on the information from Google. The adjacent
building makes a creditable YMCA.
1
2
3
Above: Composite map of Armentieres trenches showing Lunatic
Lane exiting from the Asylum. Maps 36NW2&NE1 of 18 January 1917 and 36NW2 of 02
September 1918 (Squares I2,3 and 4). The 1918 map shows the position of the German
trenches and wire during their occupation of Armentieres. It is assumed that these are
the old British trenches and wire as used by 42nd Battalion in late 1916 and
early 1917.
Click on the image to open an 124Kb, A4 landscape map of the British and German
front lines of 18 January 1917. Source: Both TNA WO297/872
... you were led away into the grounds of another, larger building, this
time made of brick, that was an Asylum; and from there, via Lunatic Lane, into the lines. Lunatic
Lane began as a cobbled street, then became dirt, and before you quite knew it you were on planks.
From this point the duckboards, for all their twisting and turning, led straight to war.
10
We experienced much difficulty getting through the trenches with our
full packs and equipment, and an unauthorised blanket or two. Especially was this so when we met
parties of troops coming from the opposite direction whom we had to pass. We, however, were
learning. Ever afterwards, our packs and blankets were left at the Quartermaster's store
prior to taking over the line, and they were called for again upon our relief.
1805info8f, sheet 7
Hoverbox Photo Gallery - The 42/Bn's way to the
front yesterday - Source: AWM
This feature does not function correctly on phones and tablets
1. On patrol
December 1916 Source: AWM E00096
2. On their way to Lunatic Lane, enter the Asylum grounds. December 1916.
Source: AWM
3. Number 12 Platoon, return to their billet in the
cotton factory. December 1916. Source: AWM E00111
1
2
3
Hoverbox Photo Gallery - Houplines 1916-17 -
Source: AWM
This feature does not function correctly on phones and tablets
1. The Houplines Asylum as it
appeared in 1917. Source: AWM H01083
2. 3rd Division inspect Houplines ruins
December 1916. Source: AWM E00108
3. 38Bn in the Houplines ruins
December 1916 Source: AWM E00106
1
2
3
Left: 3/Pioneers celebrate Christmas 1916 in Armentiéres Source: AWM
E00109
Christmas Eve and Christmas Day, 1916... were
unexpectedly quiet. A pleasing feature, and to us a great surprise, was to discover how
exceedingly well the organisation of the Battalion was being maintained. The transport
brought their limbers right up close to the firing line. Working and carrying parties,
working forwards and backwards, like streams of ants, kept the troops supplied with
ammunition, wire and all the necessities for carrying on warfare.
The comfort of the men was not neglected. The Battalion cooks, who were
always referred to as "The Babbling Brooks," installed their travelling kitchens in the
subsiduary (sic) lines. There were four of these cookers. One to each company. Throughout the day
the cooks kept us supplied with hot food. There was tea, morning and evening, and stew at midday.
These meals were brought up from the cooks by mess-orderlies who worked together in pairs.
Strapped to the back of one of them was a large vacuum container filled with either stew or tea.
These were always acceptable and generally quite hot. The mess-orderlies also distributed the
large Army biscuits, which we called "Anzac Wafers," on account of their thickness and
weight. They also brought round issues of cheese, tins of bully beef, jam and bread. The latter,
when plentiful, would work out at a daily ration of "four men to a loaf". These
commodities were carried around in sand bags, which had a way of shedding their jutey hairs on
the contents. Especially did they spread themselves on the cheese and margerine (sic), which was
the name of the substitute for butter.
1805info8f, sheet 8
Some of these parcels of comforts were delivered to us on Christmas Day
and contained among other things, Christmas puddings. These were served up to us, steaming hot
and in perfect condition. The parcels also contained tins of cocoa and milk, ready to be made hot
at any time by the aid of blocks of composition containing mainly Benzotine, and known to us by
the name of "Tommy Cookers." Besides these, there were fruit cakes, confectionery and
tins of various delicacies. There were socks, gloves and cap-comforters, knitted by loving hands.
These prevented the cold penetrating the extremities whilst large sheep-skin vests kept our bodies
warm.
Although there is no record that shows that anything of
outstanding importance occurred during this, our first term in the trenches,
yet it was a period over which the Battalion had been subjected to a most
serious and vital trial. Officers and men alike had been put to the test. It
was our initiation. All ranks from the Battalion Commander down to the
lowliest private soldier had learnt what was likely to be expected of him,
and how he might be called upon to act spontaneously in cases of emergency.
Here we had received first-hand knowledge and insight into the workings of
the military machine [and] hardened us to withstand the rigours of intense cold and discomfort, and here it was
that we learnt that it is possible to bear the deafening and demoralising roar of hostile
artillery barrages unflinchingly and with unimpaired nerve.
Hoverbox Photo Gallery - In the Houplines front line -
Source: AWM
This feature does not function correctly on phones and tablets
Showing the trenches when the
Australian's arrived in November 1916, and the conditions John
Henry experienced during December 1916
1. 4 Bn in the Houplines trenches November 1916. Source: AWM H15701
2. 39 Bn in the Houplines trenches
December 1916 Source: AWM E00086
3. 3/Pioneers in the Houplines trenches 18 December 1916. Source: AWM H16988
1
2
3
Nightly our wiring parties and patrols climbed over the top
to strengthen our defences and to learn what could be learnt about the enemy's.
It was during this period we experienced the eeriness of No-
man's Land, got used to machine-gun bursts, to the "ping" of bullets, to
the weird shadows moving up and down, [...] as the enemy's star-
shells rose and fell, and to the feeling that at any moment a hostile patrol might be
encountered.
Above: 44th Battalion Trench raid, in the Houplines area, in April 1917 Source: AWM ART03534
1805info8f, sheet 9
On [New Year's Day, 1917] ... we were relieved in the trenches by the
14th Battalion, and assumed that we were out of the line or a while, but we had yet to learn of a
military paradox that existed, namely "When you are in the Line-you are in. And when you are
out of the Line-you are still in."
And so it was with us. No sooner were we
relieved in the trenches than the entire Battalion was ordered back again employed as
working parties.
... A working party consisted of detachments of men sent out to
perform certain laborious work, such as digging trenches and laying cables. There were
also "carrying parties," for taking up to the front line barbed wire,
duckboards, ammunition, etc. "Wiring parties" laid barbed wire entanglements in
No-man's Land in front of our trenches. There were also "ration parties"
for carrying rations and "burial parties.".
Above: 40/Bn working party at Houplines December 1916
-
Source AWM E000105
A working party might be under the supervision of an engineer and build
railways and construct concrete dug-outs, or be directed by some pioneer officer in the reveting
of trenches and the laying of duckboard tracks. They also built gun pits for the artillery and
emplacements for the Stoke's Mortar Batteries.
The Brigade Staff was particularly fussy about certain details, such as
the exact time the working party reported, the quantity of work performed, but most especially,
the exact number of men who were detailed for the job.
Instinctively we learnt how to avoid difficulties and to observe the
brewing of trouble. On one occasion a working party of one hundred was detailed to report to an
engineer officer for the job of burying a cable. Only ninety-six men assembled. It was too cold
to wait about for the other four stragglers, so the N.C.O. in charge marched them off and everyone
thought all was well, until suddenly a Staff Officer was observed standing ready to check their
numbers. Half the party marched by the officer and was counted, and then whilst he was busily
engaged in checking the remainder, the four men who comprised the leading file doubled round the
nearest street corner, re-joined the party at the rear and marched past as the last four, and
thus made up the full complement.
Whilst at Armentieres we occupied a sector in the Houplines district
called L'Epinette Salient, which was approached by trenches known as Quality Street [Road]
and Willow Walk. The names of the communicating trenches to right, left and centre sectors were,
respectively, Plank Avenue, Japan Road, and Second House Avenue.
1805info8f, sheet 10
Above: Map 36NW2&NE1 of 18 January 1917 and 36NW2 of 02
September 1918 showing L'Epinette Salient Source: Both TNA WO297/872
Click on the map to open a 68kB A4 landscape showing a wider area Note: Whilst Japan Road is clearly named Second House Avenue may be Avenue Road.
There is no trench marked Plank Road. Lunatic Lane enters from the west.
On 01 January 1917 the War Diary records the Battalion as the 'D' Battalion, behind the
lines of Armentieres employed on working parties and at Raiding School. The Battalion moved
back to the same trenches on 06 January 1917.
The 42nd remained in this locality, until relieved by the 35th Battalion
on March 11th. In the meantime the usual trench warfare continued, casualties occurred daily,
whilst the weather was exceedingly rigorous; in fact, it was the coldest winter known in these
parts for many years past.
Hoverbox Photo Gallery - Buterne Avenue trench, Nouvel Houplines -
Author: 03 October 2007
This feature does not function correctly on phones and tablets
These photographs show the possible remains of Buterne Avenue trench. The
trench of January 1917 sits very close to the present position of the drainage ditches.
Allowing for modern farming .....
1. Buterne Avenue Trench, now a drainage
ditch
2. Modern aerial map showing
Buterne Avenue Trench and farm
3. Trench map 18 January
1917 showing Buterne Avenue Trench and farm Source: TNA WO297/872
4. Buterne Avenue Trench
1
2
3
4
John Henry again reported sick on 03 January 1917 to the Victorian 10th Australian
Field Ambulance (AFA) in Armentieres. He was then transferred first to the 2nd
Australian Casualty Clearing Station (ACCS) at Trois Arbres, a small outlying locality of the
French town of Steenwerck, and then on to 3rd Canadian General Hospital at Boulogne
with enteritis. 2/ACCS, at Trois Arbres, which was featured in the World War 1 Australian Army
Nursing Service in the 2014-15 Australian television series 'ANZAC girls'. Enteritis kept John Henry away from the front until 14 June 1917 when he was attached to H&
D Dept, Rouelles. On 07 July 1917 John Henry returned to 42nd Battalion in the Messines sector,
after the battle of 7-14 June 1917 and shortly before the Battalion moved to 'Rest Billets T2
Central Belgium - La Douve Camp'.
1805info8f, sheet 11
Map locating 2/ACCS at Trois Arbres and 9/AFA on Ravelsburg Ridge Source: Trois Arbes
and 2-ACCS (Accessed: 01 November 2014)
1805info8f, sheet 12
Monash and 3rd Division at Messines11
Pedersen's account records John Henry's experiences prior to Messines. Sir John Monash,
as CO 3rd Division, appreciated thorough attack preparation together with the quality and training
of assaulting infantry. Messines would be the first Australian attack using the new platoon
structure: self-contained units comprising of a sections of Lewis Ginners, bombers, rifle
grenadiers and bayonet men. Prior to Messines, each section was trained to their skills, together
with the taking and holding of craters.
The 3rd Division took over its front of attack on 27 April. [from River
Lys on the south to Ash Lane inclusive (map referencee U.8.c)] 12 During the next
month, brigades completed their rotation through the training area at Quelmes. Detecting the
frequent changes, the Germans raided on 17 and 18 May, but were unsuccessful. Five raids had also
been repelled in March and April, prompting Bean's comment that in defence, the 3rd was 'to
say the least, fully up to the standard of the older divisions'. 13
After 31 May, as the offensive approached the entire 3rd Division line was held by 41st
Battalion who launched a series of raids to capture prisoners and to check the effect of their
bombardment on the wire and defences.
On 3 June the Germans had begun nightly gas bombardments of Ploegsteert Wood, and on the 6 July
the gas and high explosive shelling commenced just as the 3rd Division started to move through it.
The gas, laying stagnant, seriously delayed the approach march, necessitating the prolonged
wearing of gas masks. The high explosives caused confusion to the four columns. In all the
Division suffered a thousand casualties and was seriously delayed. Bean recorded: 'Throughout the
night the moving factor was the determination of the men themselves to reach the "jumping off"
position in time' 14 by 0310.
The 11th Brigade and therefore 42nd Battalion were not directly involved in 3rd Division’s
Messines attack. When participating in the Warneton Stunt, they would benefit from Monash’s
experiences.
The Warneton Stunt - John Henry's second tour of duty in France
Above: Map of 42nd Battalion's route to Warneton 4 May
1917 to 26 September 1917
Warneton Stunt – the strategic overview15
On the morning of 31 July 1917 John Henry, as a member of 'A' Company, may have been
involved in a 'highly successful diversion operation carried out by 'A' and '
B' Companies' close to Messines, known as the Warneton Stunt.
At the time of the Warneton Stunt, General Plumer, with Second Army, was planning a large feint
towards Lille in order to spread the German artillery away from General Gough’s main Fifth Army
attack further north. II ANZAC were to prepare minor operations, the so-called stunts, on their
respective fronts.
When 3rd Division took over the Messines sector, the outgoing 25th Division had created an
inverted salient at Steignast Farm, which was well behind the flanks. Over a difficult period of
eighteen days, Monash ordered the construction of new defensive trenches. In response, the Germans
reinforced their advanced posts, the strongest of which were on the Windmill Ridge: a long low
spur overlooking Monash’s lines and preventing his view of the Warneton Line. (See maps below)
1805info8f, sheet 13
On 3 July, after the failure of attacks by small patrols, Brigadier General John Cannan of 11th
Brigade proposed a larger operation to clear the ridge. Monash, on returning from leave, developed
into a wider and deeper thrust confining the Germans to the Warneton Line and establishing a more
secure winter defensive line. Monash had proposed a smaller operation with a greater chance of
success.
To convince the Germans that a serious attack was pending, Monash ordered two strategies. Wire
cutting raids began on the Warneton Line and 37th and New Zealand battalions began to mop up the
German flank outposts to screen the real attack. At 0345, the Australian attack, preceded by
untried Stokes mortar smoke bombs developed by 3rd Division, Lieutenant A. S. Varley, to confuse
the Germans when 3rd Division’s attack coincided with Fifth Armies.
‘On 11 July 1917 the 9th Brigade entered the line to allow the 11th to
commence training for the attack. Monash discussed the plan thoroughly with Cannan, criticized his
rehearsals and, on 24 July, held a 'long and important conference ... of all concerned'. The
ground resembled a quagmire, and the approach marches of the 42nd and 43rd battalions on the 31st
took five and seven hours, respectively, after buses dropped them at the old Messines front line.
By 4.05 a.m. the first wave had reached the wire of the Warneton Line to protect the second and
third waves while they established outposts behind it.’ 16
The smoke-screen on both flanks was effective. It seemed as if the
Germans believed that a heavier attack was about to follow, for they began to withdraw their
guns, resulting in little shelling until 2 p.m. By then they realized the advance had ceased and,
as steady rain fell, the new line was bombarded heavily. One post was temporarily lost during the
night, but when a second counter-attack was launched at dawn, it was broken by the artillery and
the machine-gun barrage, which the Divisional Account described as excellent. Monash was observing
his own principles when he relieved both assaulting battalions shortly after daybreak […].
17
Although the Germans knew that Gough's attack was the main offensive, and Plumer’s diversionary
attack was a failure, they believed the 3rd Division would attack the Warneton Line, an objective
far exceeding Monash's modest aims. Through Monash’s skilful planning of the artillery and
machine-gun barrages Windmill Ridge was retained against counter-attacks, though some positions
had to be abandoned.
42nd Battalion's part in the attack
Warneton, a village to the south of Ypres and east of Messines, was the
focus for operations of the 3rd Australian Division in mid-1917. The village gave its name to a
strong German defensive line consisting, like most German defensive positions around the
Ypres Salient, of mutually-supporting concrete pillboxes and thick belts of barbed wire. Following
the battle of Messines, efforts were made to advance the British front to within striking
distance of the Warneton Line. On 23 June 1917 the 3rd Australian Division joined this effort and
the 11th Brigade was tasked with digging a new front line several hundred metres forward of the
old one. Assailed by both the elements and German fire, it was not an easy task for the working
parties, and the brigade's time on this task was subsequently remembered as a feat of endurance
which became known as "the eighteen days". As well as its defensive works, the Brigade was also
required to mount a series of raids and small attacks in an effort to drive-in the German
outposts established forward of the main defences.
In order to finally destroy these advanced posts an attack was launched
by the 42nd and 43rd Battalions of the 11th Brigade on the night of 31 July, which also served as
a diversion for an offensive taking place further to the north. The posts were captured and held
in the face of heavy counter-attacks, the Germans had a ready supply of reinforcements in the
posts of the Warneton Line, advancing the British line another few hundred metres. 18
The Unit history confirms the objectives of the Stunt. See also the aerial photograph and map below.
1805info8f, sheet 14
We were relived in the Messines sector on July 11th by the 36th
Battalion and moved into tents and shelters by the side of a small stream called "Le Petit
Douve." Thence onwards until the end of July a continuous series of downpours saturated the
ground, turning it into one huge bog. The little streamlet became a swiftly flowing-river, ready
to burst its banks at any moment, so that the conditions under which we existed were moat
discomforting. Our strength was increased on July 14th by a draft of 108, and again on the 16th
by a further draft of 50. 19
Above: Modern aerial photograph of the battlefield 2014. Click on the image to open a 100kB A4 map in a new window.
Appendix 1 to War Diary - 42nd. Battalion. A.I.F.
Month of July 1917.
Diversion carried out by 42nd. Battalion on the morning of 31st. July
1917.
(1) Plan of Operation.
a). The 42nd. (left) and 43rd.Btns. (right) A.I.F. - were to move from rest
Billets at La Douve Camp (T.2.C) via WULVERGHEN to MESSINES on the night of 30/31st.July
and be in position in Assembly Trenches as per sketch attached at Zero -1 Hour
(b) Zero hour was fixed at 3.50am on the morning of 31st. July.
(c) The 42nd. Battalion was to attack on a frontage of 500 yards from the CINEMA Rd., on
the north of KIWI Road on the south (see sketch att.)
(d) A and B Coys ( A right) and (B left) were to form assaulting waves to follow our
barrage as closely as possible , deal with enemy posts 4,5,6,7,8,9,(sketch) and cover
consolidation by establishing a line of shell holes 150 x west of enemy wire in WARNETON
Line, where our barrage was to rest.
(e) At Zero plus 1 hour 50 minutes "A" and "B" Coys. were to fall back
by sections at 15 minute intervals in the following order (1) Riflemen (2) Rifle
Grenadiers. (3) Bombers (4) Lewis Gunners- and help to dig
(f) "D" Coy. , less 1 Platoon, was to follow behind assaulting wave, mop up and
establish new posts III.-IV and V (sketch)
(g) "C" Coy. and I Platoon of "D" Coy. was to dig Red Dotted Line
(marked green on sketch) and C.T.
The operation was highly successful, the objective was reached and every post
held.
Our casualties were 40 killed, 50 severely wounded and 100 slightly wounded.
[..] Lanell Major Intelligence Officer - 42nd. Bn.
1805info8f, sheet 15
The Warneton Stunt, which we carried out in conjunction with the 43rd
Battalion, although directed mainly towards wiping out the enemy's strong posts established in No-
man's Land, which had caused us so much annoyance, was also devised to serve as a diversion for
the offensive taking place on the North-west (Belgium) Front.
On the night of July 31st we returned to the trenches, performing part
of the journey by motor lorries. The ground was sve hours to make
the approach march.
The 43rd Battalion attacked on the right. The 42nd Battalion attacked on
the left. The operation was highly successful. Strong post after strong post was attacked and
captured along with many prisoners and counterattacks beaten off. It is estimated that 150 of the
enemy were killed in our first attack.
Our casualties were fairly light but our captures were many. Our men
were utterly exhausted by the strain of fifty hours continuous fighting and digging, in the most
abominable weather. The Corps Commander awarded eight of our men military medals for their
conspicuous achievements on this occasion. 21
Strength Officers 33; O.R. 946 no change.
Weather Dull Cloudy; slight rain. At 3.50am the battalion 600 strong attacked enemy posts
east of MESSINES and advanced our line 250 yards on a frontage of 500 yards
Result of Operation 30/31st. July.1917

        Appendix No. II I
Approach march took five hours. Forward assault waves consisted of "A" and "B" Coys. "D" Coy. in second wave did
mopping up and consolidation of Roman Posts III, IV and V. "C" Coy. dug Red Dotted Line.
The assaulting wave found 1 machine gun in each enemy posts 8 and 9 and captured these
guns. Another Machine Gun was captured at Enemy Post No.7A After the capture of post.8
and 9 the enemy put up no resistance except for some hand to hand fighting near small
posts at U 6 a C 5 78., near the enemy communication trench this C.T. was
only about 2 feet, deep. A dug-out was found on KIWI Road where previously
		located.
U 5 B 85.95. This was a dressing station. The enemy had put up wire be[.]ing
		post 8 and 9 which was found uncut but cut by Riflemen. An enemy pineapple thrower was
		captured at the Rondevous [sic] at about O.35.d 6.0. Enemy post 11 and 12 were not found.
On the north no opposition was found at the crater of enemy post No.3. Enemy
		communication trench running S.E. from this post was mopped up and a block put into it
		where it ran into enemy wire. Enemy post 4 was garrisoned by the enemy and was captured.
		The consolidation of posts in O.35.d. was attacked from both North and West and overcome
		without difficulty.	A machine gun was captured here. This gun was mounted later XXX in
		one of our posts and used against the enemy. The assaulting wave lay up just west of the
		enemy WARNETON Line wire. No shell fire was experienced by the men while laying up here.
[...] ENEMY SHELLING during ATTACK.
Between 5 and 7 all quite [sic]. - Men dug hard and re-organised. Between 10am and 1pm.
enemy was ranging with 15cm. on the Red Doted Line. Between 2 and 5pm enemy shelling was
very heavy. Diggers were withdrawn temporarily to old front line. CASUALTIES Estimated about 200 of the enemy killed during the attack.Prisoners - 2 Officers, 5
N.C.O's and 57 other ranks.
For position s of Red Dotted Line and Posts , see map attached.
Intelligence Officer - 42nd. Battalion.
Source: War Diary AWM4-23/59/9
1805info8f, sheet 16
Above: Diagrammatic map of Warneton Stunt approach and
objectives. Left: Map key Sources: Trench map 28SW4 18 July 1917 TNA WO 297/803
Above: From Steignest Farm north-east to the assembly
trenches, approximately by the overhead wires in 2008.
1805info8f, sheet 17
Right: War Diary diagrammatic map of the Warneton Stunt - 31
July 1917
Note the slight differences to those reported in Bean.
Source: AWM4-23/59/9
The approach march, camp
and headquarters - Author: 03 October 2007
This feature does not function correctly on phones and tablets
1. La Petit Douve Farm know as La
Basse Cour
2. Farm and river Douve along the N365towards Messines (Mesen) church.
3. La Petit Douve Farm
4. 2nd Bn's HQ at Steignest Farm
1
2
3
4
1805info8f, sheet 18
Above: Schnitzal Farm from Petite Douve showing the 43
rd Bn's water logged approach march across the valley of the river Douve
in 2008. Behind Schnitzal Farm was Ungodly Trench and the present Bethlehem West
Cemetery.
Above: Diagrammatic map of Warneton attack Background
source: TNA WO 297/803
1805info8f, sheet 19
Above: Composite map of the Warneton Stunt Background
source TNA WO 297/803
The map represents my interpretation of the data available. An exact representation of the
situation on the battlefield is difficult to determine because of data conflicts within the War
Diaries.
The planning document of 11th Brigade give map references for both the German
posts and those to be dug by the Australians.
The battle narratives of the 42nd and 43rd Battalions often give
different references. It is assumed that these references are created as a result of the
action but the preciseness may vary because they were determined in the heat of battle.
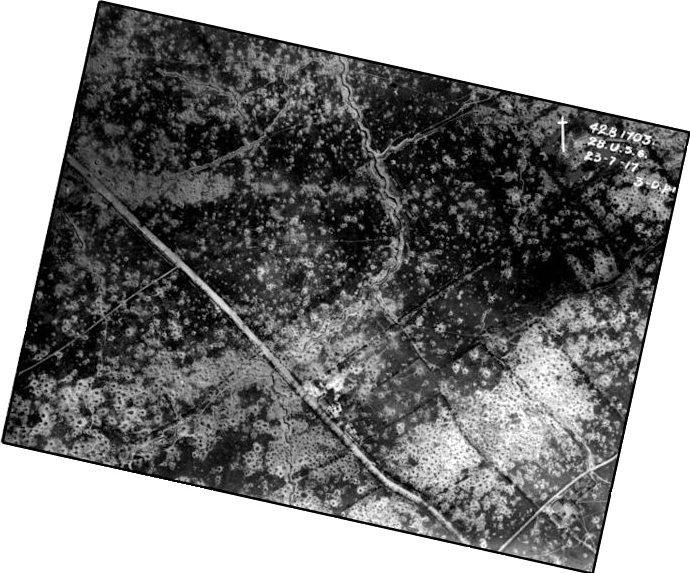
Above: A north pointing high altitude aerial photograph,
taken by 'B' flight 48 Squadron at noon 12 July 1917, showing the pre-Stunt
cratered landscape of the attack. Click on the photograph to open an A4 landscape annotated photograph in a new
window. This is my interpretation of the locations and visible trenches, from the 28 SW4
map shown above. Source: IWM 22 Box 235/1703
1805info8f, sheet 21
Above: A north pointing aerial photograph, taken at 3pm 23 July
1917, showing the shell marked area of 43rd Battalion's attack. Source:
IWM 23 Box 235/1632 Click on the photograph to open an annotated A4 landscape image in a new window.
The War Diary continues with the results of the Stunt.
CONDITION of POSTS. Roman V Post (about U 5 b 7 9)75 yards of trench dug here 3½ feet deep and fire-
bayed. Communication Trench to it runs along old enemy trench KIWI Road.
Post Roman IV. (O.35 D 6 2) and III (O 35 d 66.38.) are practicall (sic) connected. 150
yards of trench dug and fire-bayed. Depth about 3½ feet. Except for one bit about 20 yards
which is only about 1½ feet down. Post Roman IIIa (O 35.d. 55.50) this post was put
in owing to nature of ground which did not afford good view of enemy on left flank from
Post Roman III. At Roman IIIA 36 yards of trenches dug. Fire-bayed and traversed to depth
of about 3 feet.
RED DOTTED LINE
Is dug slightly forward of Line as planned. Continues from connection with Right Battalion
digging up to about O 35.d.4.2 Then comes a gap for a short distance. Then another
section of the Red Dotted Line Behind bushes in hedge about O 35.d.30.35 Then another gap
of about 80 yards to oldX front line. 50 yards of enemy wire was put out in front
of Red Dotted Line. Wire taken from behind enemy posts 8 and 9.
1805info8f, sheet 22
Following the Warneton Stunt the 3rd Division, exhausted by their march to the rear, move into
Second Army Reserve for six weeks’ rest, with the 42nd based at Lumbres. The ample time for
relaxation was tempered by continued disciplined training and Company inspected clean-shaving and
smart dress.
Bean observed […] The 10th and 11th are remarkably healthy . . . they are
great families. The battalions in them stick together, are enthusiastic about one another and
don't crab one another as some of our battalions do'.
The number of estaminets increased sharply in response to demand [...]
'in the village of Lumbres which could scarcely have 400 inhabitants a French woman told me
(Leo) that ... the advent of the British Army the number [of houses that sold beer] had doubled.
Of the remainder of the houses a large percentage catered for the egg and chip demand ... The
Lassalle family estaminet in Lumbres was for eating purposes only. 24
Hoverbox Photo Gallery -
Lumbres 1917 This feature does not function correctly on phones and tablets
1. Lassalle family estaminet Quai du Bliquin, Lumbres
May 1917 - Hawkes Bay Museum
Trust Ref:19256 2. Lumbres market square 1917 - Wiki
Pas-de-Calais
1
2
The battlefield today
Hoverbox Photo Gallery - Views of the Battlefield
in 2007 - Author: 03 October 2007
This feature does not function correctly on phones and tablets
1. The modern Les Quatre Rois cross
roads on the Battalion left
2. The fields of attack - Hun's
Walk to the Start Line
3. The modern Kiwi Farm
4. The 1917 remains of the moated
Kiwi Farm and the attack boundaries
1
2
3
4
Above: Looking from the junction of Hun's Walk and
Military Road to the modern Kiwi Farm objective 2008
1805info8f, sheet 23
Back to hospital
Right: 9/AFA at Point d'Achelles 04 December 1917 (Very close to the
position of 2/ACCS in the map above) Source: AWM E01313
On 13 August 1917 a cut to the left hand sent him to 9th AFA, (Dressing station occupied
by the NSW 9th Field Ambulance at Ravelsburg (Heights/Ridge between Bailleul and Neuve
Eglise (Nieuwkerke)) only to be transferred 3rd A.D.R.C. eight days later. He rejoined his
battalion on 23 August 1917 farm billets at Remilly Wirquin, 19 miles (31km) west-south-
west from Hazebrouck.
End Notes
Edward Thomas, 3 March 1878 - 9 April 1917, Killed in Action at the Battle of Arras. by a
shell's concussive blast wave as he stood to light his pipe.
Brahms, p.20
ibid p.21
Illustrated guide to the battlefields (1914 1918), Ypres and the Battle of Ypres,
Michelin, London, 1919
Began as Groupe Coisne et Lambert, Armentieres in 1866 in the same building, but with a
modern extension, it is part of TRP Charvet.
Marie François Sadi Carnot - President of France from 1887 until assassinated by an
Italian anarchist named Sante Geronimo Caserio, Lyon, 24 June 1894
Imperial War Museum, Photographic Archives, Lambeth Road, London SE1 6HZ
ibid
Graham Howie, Stand To! No.135, Journal of the Western Front Association
Sources:
Bean, CEW, 'The official history of the Australians in the war of 1914-18', Vol IV, '
The Australians in France' Angus and Roberts, Sydney, 1933 pp.712-721
Brahms, Vivian, The Spirit of the Forty-Second', Smith & Paterson, Brisbane, 1933 -
Naval and Military reprint
Pedersen, PA, Monash as Military Commander, Melbourne University Press, Carlton,
Victoria, 1992
This page was created by Richard Crompton
and maintained by Chris Glass